Setting up legacy Replicon timesheets
Before releasing the current version of Replicon, we offered another 'legacy' version that some customers still use. This legacy version is in some ways exactly like the current version, but it also differs in some ways.
The content below applies solely to legacy timesheet formats. See the note in each section intro for information on equivalent features in the latest version of Replicon.
Setting up timesheet templates
Are you setting up a later version of Replicon?
If you don't see the Standard and In/Out options when selecting a format, you're likely using a later version of Replicon that supports 'configurable' timesheets. Refer to Setting up timesheet templates for information on creating configurable timesheet templates.
A timesheet template is a group of timesheet settings that is assigned to users. Each timesheet user must be assigned a timesheet template in their user profile before they can record time they spent working.
Templates allow you to manage different settings for different types of users. For example, you might want to allow only a certain set of users to enter time against projects. In this case, you could create a timesheet template with project options enabled, and assign it to that set of users.
Default timesheet templates are available that you can use or edit to meet your requirements. You can also create as many new templates as you need.
What timesheet formats are available?
When you create a template, you may need to choose which timesheet format to base the template on. The available formats depend on when you started using Replicon.
Standard
Users enter the duration of time they worked on each task or activity, each day.
Users can enter time in the web application or the Replicon Mobile app.
In/Out
Users enter the time they started and stopped working on each task or activity throughout the day. Can also be configured for clocking in and out.
Users can enter time in the web application or the Replicon Mobile app.
Adding a timesheet template
To add a timesheet template:
- Go to Administration > Timesheets > Timesheet Templates.
- Click Add Timesheet Template.
- Enter a template name, and select a timesheet format – either Standard Timesheet or In/Out Timesheet.
A table listing all timesheet options that apply to the format you selected displays.
- Select or deselect timesheet options, as desired.
For information on the available settings, refer to Standard and In/Out timesheet template options below.
- Click Add.
Standard and In/Out timesheet template options
Are you setting up a later version of Replicon?
If you don't see the Standard and In/Out options when selecting a format, you're likely using a later version of Replicon that supports 'configurable' timesheets. Refer to Setting up timesheet templates for information on creating configurable timesheet templates.
You can now assign the template to users in the Timesheets section of the user profile.
When adding a timesheet template using the Standard or In/Out formats, you'll need to choose which format to use and set the options in the template. Once the template is created, you can assign it to users in their user profile.
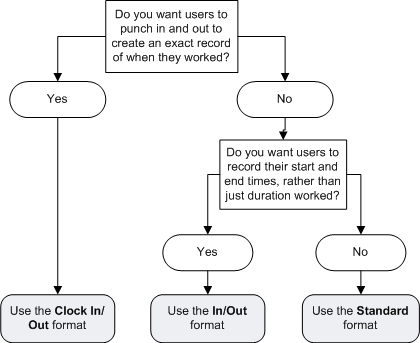
Should we use the Standard or In/Out format?
There are actually three types of timesheets that can be created using the Standard and In/Out formats:
|
Standard |
Users enter the duration of time they worked on each task or activity, each day |
|
In/Out |
Users enter the time they started and stopped working on each task or activity throughout the day |
|
Clock In/Out |
A variant of the In/Out timesheet. Users click a button in the timesheet when they stop and start working. Enable this format by selecting the Enter Time using In/Out Button option in the In/Out template and, typically, deselecting the Edit Time on Timesheet option. |
The following diagram may help you decide which of these formats to assign.
About the timesheet options
After choosing your format, set the options in the template based on your requirements. Each option is outlined below.
|
Option name |
This field... |
|---|---|
|
Show Projects and Tasks |
Displays projects and tasks in the timesheet, and allows users to enter time against them |
|
Project/Task Selection is Required |
Requires the user to select a project in each timesheet row before they can submit their timesheet |
|
Select Projects By |
Filters projects in the timesheet by either client or program, depending on the option selected. Set this option to Do not filter if you’d like only projects and tasks to appear without their associated clients or programs. |
|
Show Billing Options |
Displays a Billing column in timesheets from which the user can select a billing rate, if applicable |
|
View Task Progress |
Shows a task progress bar, showing hours worked versus hours estimates, on the right-hand end of each task row. Available in the Standard format only. |
|
Show Activities |
Displays an Activities column in the timesheet, that the user can select activities from |
|
Activity Selection is Required |
Requires the user to select an activity in each timesheet row before they can submit their timesheet |
|
Enter Breaks |
Allows the user to enter breaks in their timesheet. Available in the In/Out format only. |
|
Enter Time using In/Out Button |
Displays a Clock In/Clock Out button in the timesheet that the user must click to enter their start and end times. Available in the In/Out format only. |
|
Edit Time on Timesheet |
Allows the user to edit time they’ve entered in their timesheet. Available in the In/Out format only. |
|
Use Stopwatch |
Lets the user to use a stopwatch to enter work times for the current day in their timesheet. Available in the Standard format only. |
|
Allow Blank Timesheet Comments |
Allows the user to submit their timesheet without entering comments. If this option is deselected, they must enter a comment for each timesheet entry before they can submit. |
|
Allow time entry beyond start and end date of the task |
Lets the user to enter time against tasks to which they are assigned before the task’s start date, and after its end date |
|
Allow time entry beyond start and end date of the project |
Lets the user to enter time against projects to which they are assigned before the task’s start date, and after its end date |
|
Allow Copying from Previous Timesheets |
Allows the user to copy data entered in their saved timesheets |
|
Allow Overlapping Time Entries |
Allows the user to submit timesheets that include overlapping time entries. Available in the In/Out format only. |
|
Reopen Timesheet before Approval |
Allows the user to reopen their timesheets that are awaiting approval in order to make corrections |
|
Reopen Timesheet after Approval |
Allows the user to reopen their approved timesheets in order to make corrections. Timesheets that have been invoiced cannot be reopened. |
|
Allow Blank Resubmission Comments |
Allows the user to resubmit a timesheet that was reopened without entering any comments in the comments field that displays. Deselect this option to require resubmission comments. |
|
Notice Acceptance is Required |
Requires the user to accept the timesheet notice before they can submit their timesheet |
|
Auto-submit timesheet on due date |
Submits the timesheet automatically when it is due. This option is often enabled for CloudClock users, so they don’t need access to the Replicon web app. |
|
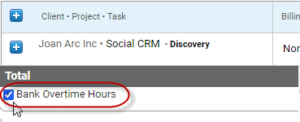
Choose whether to Bank Overtime Hours |
Displays a Bank Overtime Hours option in the timesheet. The user can select this option to bank any overtime hours they worked that weren’t banked automatically based on their overtime rule. |
|
Calculate pay using Pay Rules |
Applies the user's assigned pay rule to calculate overtime, rather than their overtime rule. This option is only available to customers who have pay rules functionality included in their products. |
|
Keep timesheet in sync with resource allocation |
Adds the user’s project allocated hours to display automatically in their timesheet. Timesheet hours update when allocations are updated. |
|
Show Timesheet Entry Custom Field#1-5 |
Display the timesheet entry-level custom fields corresponding to the field numbers you select. Entry-level custom fields display in comment bubbles or in a timesheet column, depending on how these fields were configured. |
|
Show Timesheet Custom Field#1-5 |
Display the timesheet-level custom fields corresponding to the field numbers you select. Timesheet-level custom fields display beneath the main timesheet data entry table. |
FAQs
Why don’t my timesheet template changes appear in the timesheet?
Changes you make to a timesheet template are only reflected in timesheets that are generated after you make the change. If you need a change to apply to an existing timesheet, you’ll need to delete and regenerate it.
What happens if we edit a template that is already assigned to users?
The new template settings will take effect for any timesheets that are created in the future. Any existing timesheets will be unaffected.
Creating overtime rules
Are you setting up a later version of Replicon?
If your Administration > Pay Codes and Policies menu shows Pay Rules rather than Overtime Rules, refer to Setting up pay rules for information relevant to overtime payout.
Are you using pay rules with legacy timesheets?
If you have a product that offers pay rules, you can choose to use pay rules instead of overtime rules with legacy Standard or In/Out timesheets. To do this, enable the Calculate pay using Pay Rules option in their assigned timesheet templates.
Overtime rules define under what conditions and at what rate employee overtime is paid. They can also be used to specify whether or not overtime should be banked.
Your company's overtime rules are based on internal organizational policies regarding overtime and the laws and requirements of your jurisdiction.
You can add as many overtime rules as you need, or use or edit any of the default rules available in the system.
If you have pay rule requirements that cannot be easily met by the Replicon overtime rule templates, contact Replicon Support. We may be able to create custom pay rules using our pay rule engine.
To add an overtime rule:
- Go to Administration > Pay Codes and Policies > Overtime Rules.
- Click Add Overtime Rule.
- Give the rule a name, and select the time off types you would like included in the overtime calculations for this rule.
- Select an overtime rule template, and set up the conditions under which overtime will be paid when this rule is assigned.
- Click Save.
You can now assign the overtime rule to users in their user profiles.
Including time off in overtime calculations
You can choose whether time off entered by users is included when calculating an overtime rule, and which time off types are included. Whether or not you include overtime depends on your organization’s policies.
Example of including overtime
You create a weekly overtime rule in which any time worked over 40 hours in a week is considered overtime, and all time off is included in calculations.
If a user assigned this rule takes 8 hours of vacation, then works 34 hours during the remainder of that week, they will net 2 hours of overtime (34 + 8 = 42 hours), since the time off they took was included.
About overtime rule conditions
Conditions of an overtime rule determine:
- Which hours qualify as overtime
- At what rate (pay code) overtime for the condition will be paid
- Which overtime hours should be banked
What options are available depends on the template you are using. Many of the templates support multiple conditions.
About the overtime rule templates
Templates dictate what type of conditions you can create in a rule, and how pay is calculated based on those conditions.
Refer to Overtime rule examples for samples of rules set up using each template.
Simple rules
|
Template |
Overtime paid |
|---|---|
|
The employee is paid overtime if they work over the number of hours specified, during the time span specified. The time span can be either a day, a work week (as defined in the user’s profile), or a timesheet period.
For day-based conditions, you can select whether the rule applies to work days, weekly days off, holidays, or all days.
|
|
|
The employee is paid overtime for hours worked beyond a number you specify in a single day. You can include multiple conditions, but the employee can only qualify for overtime based on one condition each day – the one that yields the most pay. Each condition can apply to one of the following:
|
|
|
The employee is paid overtime for hours worked beyond a number you specify in a single work week, as assigned in their user profile. You can include multiple conditions, but each overtime hour is only paid overtime based on one condition. For example, one condition could pay overtime at 1.5x regular pay for hours worked over 40, and a second could pay overtime at 2x regular pay for hours worked over 50. |
Bi-Conditional rules
All of the Bi-Conditional templates are used to create rules with two overtime conditions: a Daily condition and Work Week condition.
|
Template |
Overtime paid |
|---|---|
|
The employee is paid overtime for both the Daily and Work Week conditions. Even if only one condition is met, overtime for that condition is paid. If hours qualify for overtime under both conditions, those hours will be paid at the Daily rate. |
|
|
Bi-Conditional Rule - OR (Apply condition that yields the highest pay) |
The employee is paid only for the condition that yields the most overtime pay each week |
|
The employee is paid for the Daily condition, but only if the Work Week condition is also met |
Complex rules
|
Template |
Overtime paid |
|---|---|
|
The rule involves multiple conditions, for the following time frames:
For each hour of overtime the employee works, they are paid only for the condition that yields the most pay. |
|
|
The rule can include multiple conditions, one condition each for the following time frames:
For each hour of overtime the employee works, they are paid only for the condition that yields the most pay. For work week conditions, you can choose to include hours worked on holidays in the hours total by selecting the Include hours worked on holidays check box. |
FAQs
What is straight time, as referred to in the California Overtime and Bi-Conditional Rule - OR (Apply both conditions) templates?
For information about straight time, refer to the What is straight time? topic.
What is seventh consecutive day, as referred to in the California Overtime and Best-Of templates?
Seventh consecutive day overtime applies to hours worked on the seventh day of the employee’s work week, if they worked all six preceding days. All seven days must fall within the user's assigned work week.
How does a user know they’ve earned overtime?
Once an overtime rule is assigned, Replicon calculates overtime hours each time the user saves or submits their timesheet. The last calculated number of overtime hours is displayed on the upper, right-hand corner of their timesheet.

Overtime rule scenarios
Are you setting up a later version of Replicon?
If your
Use the overtime rule templates to create overtime rules that match your organization's policies. Refer to Creating overtime rules for a description of each template.
Examples of each of the available templates are given below.
- Single Condition Rule
- Daily Overtime Rule
- Weekly Overtime Rule
- Bi-Conditional Rule - OR (Apply both conditions)
- Bi-Conditional Rule - OR (Apply condition that yields the highest pay)
- Bi-Conditional Rule - AND
- California Overtime Rule
- Best-Of Overtime Rule
Single Condition Rule
An employee is paid $30/hr. In one week, they work for 44 hours.
If they are assigned a Single Condition rule with the condition given below, they would be paid as outlined below.
|
|
Condition |
Pay |
|---|---|---|
|
1 |
1.5x their regular rate for hours that exceed 40 in a single week |
They worked 4 hours of overtime x 1.5 x $30/hr = $180 |
Therefore, the employee would be paid $180 in overtime pay that week.
Daily Overtime Rule
Example 1
An employee is paid $30/hr, and has Saturdays and Sundays off.
In one week, the employee works for 8 hours from Monday to Thursday, works 10 hours on Friday, and works 8 hours on Saturday.
If they are assigned a Daily Overtime rule with the conditions given below, they would be paid as outlined below.
|
|
Condition |
Pay |
|---|---|---|
|
1 |
1.5x their regular rate for hours that exceed 8 on a work day |
They worked 10 hours on Friday, which yields 2 hours (beyond 8) of daily overtime x 1.5 x $30/hr = $90 |
|
2 |
2x their regular rate for hours worked on a weekly day off |
They worked 8 hours on Saturday, a weekly day off, which yields 8 hours of daily overtime x 2 x $30/hr = $480 |
Therefore, the employee would be paid a total of $570 ($90 + $480) in overtime pay that week.
Example 2
An employee is paid $30/hr, and has Saturdays and Sundays off.
In one week, the employee works 10 hours on Monday, but 8 hours every other day. If they are assigned a Daily Overtime rule with the conditions given below, they would be paid as outlined below.
|
|
Condition |
Pay |
|---|---|---|
|
1 |
2x their regular rate for hours exceeding 9 on Mondays |
They worked 10 hours on Monday, which yields 1 hour (beyond 9) of daily overtime x 2 x $30/hr = $60 |
|
2 |
1.5x their regular rate for hours exceeding 8 on work days |
They worked 10 hours on Monday, which yields 2 hours (beyond 8) of daily overtime x 1.5 x $30/hr = $90 |
Monday is the only day on which they worked overtime. Since Condition 2 yields the greatest pay for Monday, that is the condition that applies, and the employee would be paid a total of $90 in overtime pay that week.
Example 3
An employee is paid $30/hr, and has Saturdays and Sundays off.
In one week, the employee works 14 hours on Monday, but 8 hours every other day. If they are assigned a Daily Overtime rule with the conditions given below, they would be paid as outlined below.
|
|
Condition |
Pay |
|---|---|---|
|
1 |
2x their regular rate for hours exceeding 9 on Mondays |
They worked over 14 hours on Monday, which yields 5 hours (beyond 9) of daily overtime x 2 x $30/hr = $300 |
|
2 |
1.5x their regular rate for hours exceeding 8 on work days |
They worked 14 hours on Monday, which yields 6 hours (beyond 8) of daily overtime x 1.5 x $30/hr = $270 |
Monday is the only day on which they worked overtime. In this case, Condition 1 yields the greatest pay for Monday, so that is the condition that applies, and the employee would be paid a total of $300 in overtime pay that week.
Weekly Overtime Rule
An employee is paid $30/hr.
In one week, the employee works 43 hours. If they are assigned a Weekly Overtime rule with the conditions given below, they would be paid as outlined below.
|
|
Condition |
Pay |
|---|---|---|
|
1 |
1x their regular rate for hours less than 37 in a week |
They would be paid their regular rate, not overtime, for the first 37 hours they worked |
|
2 |
1x their regular rate hours between 37 and 40 (these hours are marked as Straight Overtime (SOT); this pay code is sometimes required when exporting hours to external payroll systems) |
They would be paid their regular rate, not overtime, for the hours between 37 and 40 |
|
3 |
1.5x their regular rate for hours beyond 40 hours in a week |
The worked 43 hours in the week, which yields 3 hours (beyond 40) of overtime x 1.5 x $30/hr = $135 |
Therefore, the employee would be paid a total of $135 in overtime pay that week.
Bi-Conditional Rule - OR (Apply both conditions)
Example 1
An employee is paid $30/hr.
In one week, the employee works for 8 hours from Monday to Thursday, then works 10 hours on Friday, and 2 hours on Saturday.
If they are assigned a Bi-Conditional Rule - OR (Apply both conditions) rule with the conditions given below, they would be paid as outlined below.
|
|
Condition |
Pay |
|---|---|---|
|
1 |
1.5x their regular rate for hours worked beyond 8 in a day |
They worked 10 hours on Friday, which yields 2 hours of daily overtime x 1.5 x $30/hr = $90 |
|
2 |
2x their regular rate for work hours beyond 40 in a week, with the condition that they must work 8 hours of straight time each day |
They worked 44 hours, but 2 hours are accounted for in Condition 1, which yields 2 hours of weekly overtime x 2 x $30/hr = $120 |
Therefore, the employee would be paid a total of $210 ($90 + $120) in overtime pay that week.
Example 2
An employee is paid $30/hr.
In one week, the employee works 10 hours on Friday, and 39 hours total for the week.
If they are assigned a Bi-Conditional Rule - OR (Apply both conditions) rule with the conditions given below, they would be paid as outlined below.
|
|
Condition |
Pay |
|---|---|---|
|
1 |
1.5x their regular rate for hours worked beyond 8 in a day |
2 hours of daily overtime x 1.5 x $30/hr = $90 |
|
2 |
2x their regular rate for work hours beyond 40 in a week, with the condition that they must work 8 hours of straight time each day |
0 hours of weekly overtime x 2 x $30/hr = $0 |
Therefore, the employee would be paid a total of $90 in overtime pay that week. The are still paid for Condition 1 even though Condition 2 was not met.
Bi-Conditional Rule - OR (Apply condition that yields the highest pay)
An employee is paid $30/hr.
In one week, the employee works for 8 hours from Monday to Thursday, then works 10 hours on Friday.
If they are assigned a Bi-Conditional Rule - OR (Apply condition that yields the highest pay) rule with the conditions given below, they would be paid as outlined below.
|
|
Condition |
Pay |
|---|---|---|
|
1 |
1.5x their regular rate for hours worked beyond 8 in a day |
They worked 10 hours on Friday, which yields 2 hours of daily overtime x 1.5 x $30/hr = $90 |
|
2 |
2x their regular rate for work hours beyond 40 in a week |
They worked 42 hours, which yields 2 hours of weekly overtime x 2 x $30/hr = $120 |
Therefore, the employee would be paid $120 in overtime that week, since the second condition yields more total pay.
Bi-Conditional Rule - AND
Example 1
An employee is paid $30/hr.
In one week, the employee works for 8 hours from Monday to Thursday, then works 10 hours on Friday.
If they are assigned a Bi-Conditional Rule - AND rule with the conditions given below, they would be paid as outlined below.
|
|
Condition |
Pay |
|---|---|---|
|
1 |
Pays 1.5x their regular rate for hours worked beyond 8 in a day |
They worked 10 hours on Friday, which yields 2 hours of daily overtime x 1.5 x $30/hr = $90 |
|
2 |
Requires them to work at least 40 hours in a week before they qualify for overtime based on Condition 1 |
They worked 42 hours, which means they qualify for overtime pay |
Therefore, since both conditions are met, the employee would be paid $90 in overtime that week.
Example 2
An employee is paid $30/hr.
In one week, the employee works for 10 hours on Monday, 8 hours each day from Tuesday to Thursday, and then works only 4 hours on Friday.
If they are assigned a Bi-Conditional Rule - AND rule with the conditions given below, they would be paid as outlined below.
|
|
Condition |
Pay |
|---|---|---|
|
1 |
Pays 1.5x their regular rate for hours worked beyond 8 in a day |
They worked 10 hours on Monday, which yields 2 hours of daily overtime x 1.5 x $30/hr = $90 |
|
2 |
Requires them to work at least 40 hours in a week before they qualify for overtime based on Condition 1 |
They worked 38 hours, fewer than the required weekly number |
Therefore, since both conditions are NOT met, the employee would be paid $0 overtime that week.
California Overtime Rule
An employee is paid $30/hr. They have a work week that runs from Sunday to Saturday.
One week, they work for 8 hours each day from Sunday to Thursday, and 12 hours on Friday, and 10 hours on Saturday.
If they are assigned a California Overtime rule with the conditions given below, they would be paid as outlined below.
|
|
Condition |
Pay |
|---|---|---|
|
1 |
1.5x their regular rate for hours worked beyond 8 but less than 10 in a day |
They worked 12 hours on Friday, which yields 2 hours (beyond 8 and less than 10) of daily overtime x 1.5 x $30/hr = $90 (The Saturday hours beyond 8 qualify under Condition 5) |
|
2 |
2x their regular rate for hours worked beyond 10 in a day |
They worked 12 hours on Friday, which yields 2 hours (beyond 10) of daily overtime x 2 x $30/hr = $120 |
|
3 |
1.5x their regular rate for hours worked beyond 40 in a week, providing they work 8 hours of straight time each day |
They worked 62 hours in the week which yields 22 hours (beyond 40) of weekly overtime. However, 6 of those hours qualify under Conditions 1, 2, and 5. So, only 16 hours qualify as weekly overtime x 1.5 x $30/hr = $720 |
|
4 |
1.5x their regular rate for work hours beyond 0 and less than 8 on their 7th consecutive day of work |
They worked 10 hours on Saturday, but the first 8 of those are already accounted for in Condition 3, therefore they worked 0 hours of 7th consecutive day overtime x 1.5 x $30/hr = $0 |
|
5 |
2x their regular rate for hours worked beyond 8 on their 7th consecutive day of work |
They worked 10 hours on Saturday, which yields 2 hours of 7th consecutive day overtime x 2 x $30/hr = $120 |
Therefore, the employee would be paid a total of $1050 ($90 + $120 + $720 + $0 + $120) in overtime pay that week.
Best-Of Overtime Rule
An employee is paid $30/hr. They have a work week that runs from Sunday to Saturday.
One week, they work for 8 hours each day from Monday to Wednesday, and 10 hours on each day from Thursday to Saturday. The Friday of the week is a holiday.
If they are assigned a Best-of Overtime rule with the conditions given below, they would be paid as outlined below.
|
|
Condition |
Pay |
|---|---|---|
|
1 |
1.5x their regular rate for hours worked beyond 8 but less than 10 in a day |
They worked 10 hours on Thursday and on Saturday, which yields 4 hours (beyond 8) of daily overtime x 1.5 x $30/hr = $180 |
|
2 |
2x their regular rate for hours worked beyond 10 in a day |
No hours qualify for this condition |
|
3 |
1.5x their regular rate for hours worked beyond 40 in a week, with hours worked on holidays included |
They worked 54 hours in the week which yields 22 hours of weekly overtime. Note that this week has only 32 regular hours, since 8 are considered holiday time off hours. However, 8 of those overtime hours qualify under Condition 4, 4 qualify under Condition 1, and 2 qualify under Condition 5. So, only 8 hours qualify as weekly overtime x 1.5 x $30/hr = $360 |
|
4 |
1.5x their regular rate for any hours worked less than 8 on a holiday |
They worked 10 hours on the holiday, which yields 8 hours (beyond 0) of holiday overtime x 1.5 x $30/hr = $360 |
|
5 |
2x their regular rate for hours worked beyond 8 on a holiday |
They worked 10 hours on the holiday, which yields 2 hours (beyond 8) of holiday overtime x 2 x $30/hr = $120 |
Therefore, the employee would be paid a total of $1020 (= $180 + $0 + $360 + $360 + $120) in overtime pay that week.
Setting up overtime banking
Are you setting up a later version of Replicon?
Overtime banking is only available in legacy products. If you're using a later product, you should have access to time off in lieu functionality, which is very similar to time banking.
Looking for information on our banks feature?
For information on using our banks functionality, refer to Setting up banks.
Users can be allowed to bank overtime hours instead of being paid for those hours. Banked time is accumulated against the Banked Time time off type, and can be used when booking time off.
Time is banked using the pay code factor defined in the user’s assigned overtime rule. For example, if overtime hours are paid out at 1.5x the normal rate, and a user works 2 overtime hours that they choose to bank, they will bank 3 hours.
The benefits of overtime banking
Allowing time banking can increase the amount of time off available to employees, and can potentially reduce the amount of overtime the employer has to pay. Banked time can be provided as a bonus, as a work incentive, or as an alternative to paid overtime.
In most jurisdictions, banked time must be paid out if the employee does not use it.
Overtime banking workflow
- A user enters overtime hours in timesheet, and saves it.
- Depending on the setup option in effect, time is either:
-
-
- Banked automatically, or
- The user must check the Bank Overtime Hours option to bank hours
-
- The user can book time off with the hours they banked, using the Banked Time time off type.
About the setup options
There are three possible ways to set up time banking for a user.
|
Automatic banking |
You choose which type of overtime hours will be banked in the user's overtime rule. The type of hours you choose are automatically banked when the user enters time. |
|
User banking |
Users can choose to bank either all of the overtime hours in their timesheet, or none of their overtime hours. |
|
Automatic banking + User banking |
If an overtime rule has more than one condition, you can combine the two types of banking. In this case, you would choose one or more conditions to be banked automatically (Automatic banking), and the user could then choose to bank all additional overtime on their timesheet (User banking). |
Setting up overtime banking
To set up overtime banking for a user:
- Ensure the default Banked Time time off type is enabled in your system, and that it is assigned to the user in their user profile
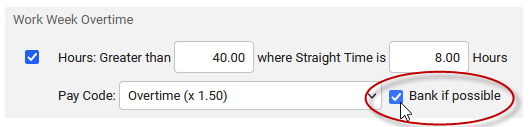
- If you’re setting up Automatic banking, enable Bank if possible for one or more conditions in the user’s assigned overtime rule.
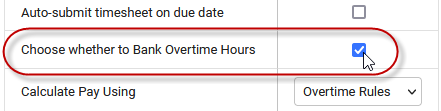
- If you’re setting up User banking, enable the Choose whether to Bank Overtime Hours option in the user’s assigned timesheet template.
If only some users are allowed to bank overtime, create a new template or overtime rule for them.
Assigning the Banked Time time off type
To enable the Banked Time time off type for a user:
- Go to Administration > Employees and Organization > Users.
- Select the user.
- Select Time Off in the side menu.
- Enable the check box next to Banked Time – Allowed.
- Click Save User Time Off Settings.
Overtime banking examples
Automatic banking
You assign a user an overtime rule with a single condition, and select the Bank if possible check box for that condition:
Weekly hours worked in excess of 40 are paid at 1.5x the regular rate.
In the user’s timesheet template, the Choose whether to Bank Overtime Hours option is NOT enabled.
If the user enters 46 hours in their weekly timesheet, 9 hours (6 hours * 1.5x) will be marked as banked automatically.
User banking
You assign a user an overtime rule with a single condition, and DO NOT select the Bank if possible check box for that condition:
Weekly hours worked in excess of 40 are paid at 1.5x the regular rate.
In the user’s timesheet template, the Choose whether to Bank Overtime Hours option is enabled.
In their weekly timesheet, that user enters 46 hours.
If they select Bank Overtime Hours, 9 hours (6 hours * 1.5x) will be banked. If they deselect Bank Overtime Hours, 0 hours will be banked, and 6 hours will be paid at their overtime rate (1.5x regular).
Automatic + User banking
You assign a user an overtime rule that has two conditions:
- Daily hours worked in excess of 8, but less then 10, are paid at 1.5x the regular rate
- Daily hours worked in excess of 10 are paid at 2x the regular rate
You select the Bank if possible check box for Condition 2 only.
In a 5-workday timesheet period, the user works 53 hours:
- 40 hours at 1.0x
- 10 hours at 1.5x
- 3 hours at 2.0x
If they select Bank Overtime Hours, all overtime hours will be banked, using the correct rate:
= (10 hours*1.5x) + (3 hours*2x)
= 21 hours banked
If they deselect Bank Overtime Hours, only hours for the condition marked Bank if possible (Condition 2) will be banked, using the correct rate:
= (3*2x)
= 6 hours banked
The 10 hours worked at 1.5x will be paid out, meaning they’ll be paid for the equivalent of 15 regular hours automatically.
FAQs
Why weren't the user's overtime hours banked when I expected them to be?
Banking time is not possible if:
- The user has not been assigned the Banked Time time off type
- The user's maximum balance for that type has been reached
If time can’t be banked, it will be paid out as overtime.
Why don’t banked hours show up in the user’s Banked Time policy?
The user’s Banked Time policy can be used to make manual balance adjustments to their banked time balance. Time off that is accumulated through banking overtime is not reflected in this policy. To view how much banked time is available, check the user’s balance instead.
Setting min/max hours that must be entered in a timesheet
Are you setting up a later version of Replicon?
This feature applies to the Standard and In/Out timesheet formats. If you are using the configurable timesheet format, refer to Setting up timesheet validation rules.
Validation rules in our legacy products can define the minimum or maximum number of hours that must be entered in a timesheet before it can be submitted. Each validation rule can include multiple conditions that must all be met before timesheet submission. Each condition can apply to either a day, a week, or an entire timesheet period.
For example, you require employees to work:
- A minimum of eight hours each work day, and
- A maximum of 60 hours in a week
You can set up a validation rule that prevents users from submitting any timesheets that do not meet those two conditions.
Validation rules are assigned to users on the Timesheets page in user profiles.
Adding a validation rule
To add a validation rule:
- Go to Administration > Timesheets > Timesheet Validation Rules.
- Click Add Validation Rule.
- Enter a name for the rule.
- Click the Add button next to the Conditions field.
An Add New Condition dialog displays.
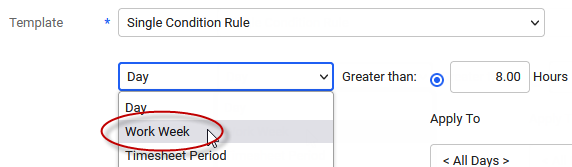
- Select the time frame for which hours worked will be validated – either Day, Week, Work Week, or Timesheet Period.
- Enter a number of hours to validate hours worked against, and select whether hours worked must be greater than, less than, or equal that value before the timesheet can be submitted.
For example, if a user needs to enter at least 40 hours in a timesheet before they can submit it, select Greater than or equal to 40 hours in these fields.
- Add additional conditions, if required, and then click Save.
About the condition time frame options
|
Time frame |
Validates hours entered for the condition against… |
|---|---|
|
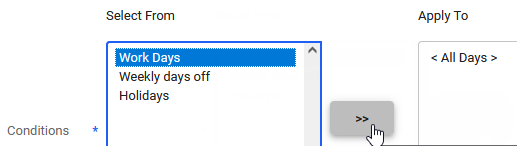
Day |
Hours worked each day, of the types of days you select. You can choose to validate all days, work days, weekly days off, or holidays. Select an option and then click the >> button to apply that type of day to the condition. |
|
Week |
Hours worked each seven-day span of a timesheet period, beginning from the first day of each new timesheet period |
|
Work week |
Hours worked during the user’s assigned work week, which may not correspond to their timesheet period |
|
Timesheet period |
Hours worked during the timesheet period. For the timesheet period time frame, you can create a custom formula that calculates the hours to validate against based on the number of days of a given type during the period and the hours worked on each type of day. |
Don’t use a week-type or work week validation condition if your timesheet period will contain partial weeks
If a timesheet period ends partway through a full week, the condition will still be applied. During these partial weeks, users are unlikely to enter enough hours to pass validation, and will be unable to submit their timesheets.
Therefore, only use the week-type condition if your timesheet period is BiWeekly, Weekly, or a Manual period set to a weekly schedule.
Creating a custom timesheet period validation rule
You can create a custom formula that calculates the value that hours entered in a timesheet will be validated against. The formula can be based on the number of days of a given type during the timesheet period or the hours worked on each type of day. Therefore, the maximum or minimum value users are required to enter can change from one timesheet period to the next, depending on how many days of each type occur during the period.
For example:
During a typical week, you require a user who works 8 hours per day to enter a minimum of 40 hours per week in a weekly timesheet period. But, in weeks when holidays occur, you want holidays to be excluded from that 40 hour value.
You could create a custom condition, as follows:
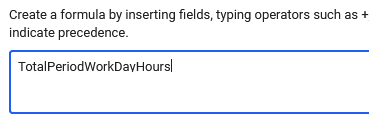
Hours entered in timesheet period must be greater than or equal to TotalPeriodWorkDayHours
In this case, if a holiday occurs leaving only 4 work days in a week, the user would only have to enter 32 hours (4 days * 8 hours per day) in their timesheet.
Adding a custom rule
To create a custom rule:
- When creating a validation rule, select the Timesheet Period time frame option.
- Select whether hours worked must be greater than, less than, or equal that value calculated using the custom formula.
- Select the
 icon. The formula edit field will display.
 - Create a formula using the available fields and operators (for example, +, -, *, and /).
- You can add fields by typing their names into the formula field or by placing your cursor in the position where you would like the field to display, and clicking the field name link.
- Click OK.
Fields available for use in custom validation rules
|
Field name |
Description |
|---|---|
|
PeriodWeekDays |
Total number of weekdays in period |
|
PeriodWorkDays |
Total number of work days in period |
|
PeriodWeeklyDaysOff |
Total number of weekly days off in period |
|
PeriodHolidays |
Total number of holidays in period |
|
TotalPeriodWeekDayHours |
Sum of hours per day for all weekdays in period |
|
TotalPeriodWorkDayHours |
Sum of hours per day for all work days in period |
|
TotalPeriodWeeklyDaysOffHours |
Sum of hours per day for all weekly days off in period |
|
TotalPeriodHolidayHours |
Sum of hours per day for all holidays in period |
FAQs
Do validation rules include time off hours?
Validation conditions do include time off hours. That is, time off hours are counted as part of the total hours required for successful timesheet validation.
For example, Jill's validation rule requires her to enter at least 40 hours per week. If she enters 32 working hours, and 8 time off hours in a week, that timesheet would meet her validation rule.
Is it possible to approve timesheets that don’t meet a the owner's validation rule?
Cost, billing and payroll managers with Force Approve/Reject permission for timesheets can submit and approve timesheets that do not meet the validation rules assigned to the user.
Why aren't minimum hours validation options (Greater than, Greater than or equal to, or Equal to) available for work week rules?
Since work week validation is relative to the user's work week, and not their timesheet period, the timesheet period may begin or end part-way through the validation work week. The restriction against validating for minimum hours helps prevent failed validations during partial weeks, when users are unlikely to enter enough hours to pass minimum hours validation.
Related topics
Time tracking setup checklist
How Replicon and Polaris timesheets work
Deleting and regenerating a timesheet
Does Replicon record an audit trail of changes?
The Timesheet tab is missing for a user