Standard and In/Out timesheet template options
When adding a timesheet template using the Standard or In/Out formats, you'll need to choose which format to use and set the options in the template. Once the template is created, you can assign it to users in their user profile.
If you are using the Configurable format, see this topic instead.
Should we use the Standard or In/Out format?
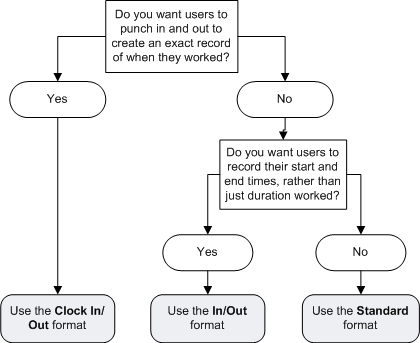
There are actually three types of timesheets that can be created using the Standard and In/Out formats:
|
Standard |
Users enter the duration of time they worked on each task or activity, each day |
|
In/Out |
Users enter the time they started and stopped working on each task or activity throughout the day |
|
Clock In/Out |
A variant of the In/Out timesheet. Users click a button in the timesheet when they stop and start working. Enable this format by selecting the Enter Time using In/Out Button option in the In/Out template and, typically, deselecting the Edit Time on Timesheet option. |
The following diagram may help you decide which of these formats to assign.
About the timesheet options
After choosing your format, set the options in the template based on your requirements. Each option is outlined below.
|
Option name |
This field... |
|---|---|
|
Show Projects and Tasks |
Displays projects and tasks in the timesheet, and allows users to enter time against them |
|
Project/Task Selection is Required |
Requires the user to select a project in each timesheet row before they can submit their timesheet |
|
Select Projects By |
Filters projects in the timesheet by either client or program, depending on the option selected. Set this option to Do not filter if you’d like only projects and tasks to appear without their associated clients or programs. |
|
Show Billing Options |
Displays a Billing column in timesheets from which the user can select a billing rate, if applicable |
|
View Task Progress |
Shows a task progress bar, showing hours worked versus hours estimates, on the right-hand end of each task row. Available in the Standard format only. |
|
Show Activities |
Displays an Activities column in the timesheet, that the user can select activities from |
|
Activity Selection is Required |
Requires the user to select an activity in each timesheet row before they can submit their timesheet |
|
Enter Breaks |
Allows the user to enter breaks in their timesheet. Available in the In/Out format only. |
|
Enter Time using In/Out Button |
Displays a Clock In/Clock Out button in the timesheet that the user must click to enter their start and end times. Available in the In/Out format only. |
|
Edit Time on Timesheet |
Allows the user to edit time they’ve entered in their timesheet. Available in the In/Out format only. |
|
Use Stopwatch |
Lets the user to use a stopwatch to enter work times for the current day in their timesheet. Available in the Standard format only. |
|
Allow Blank Timesheet Comments |
Allows the user to submit their timesheet without entering comments. If this option is deselected, they must enter a comment for each timesheet entry before they can submit. |
|
Allow time entry beyond start and end date of the task |
Lets the user to enter time against tasks to which they are assigned before the task’s start date, and after its end date |
|
Allow time entry beyond start and end date of the project |
Lets the user to enter time against projects to which they are assigned before the task’s start date, and after its end date |
|
Allow Copying from Previous Timesheets |
Allows the user to copy data entered in their saved timesheets |
|
Allow Overlapping Time Entries |
Allows the user to submit timesheets that include overlapping time entries. Available in the In/Out format only. |
|
Reopen Timesheet before Approval |
Allows the user to reopen their timesheets that are awaiting approval in order to make corrections |
|
Reopen Timesheet after Approval |
Allows the user to reopen their approved timesheets in order to make corrections. Timesheets that have been invoiced cannot be reopened. |
|
Allow Blank Resubmission Comments |
Allows the user to resubmit a timesheet that was reopened without entering any comments in the comments field that displays. Deselect this option to require resubmission comments. |
|
Notice Acceptance is Required |
Requires the user to accept the timesheet notice before they can submit their timesheet |
|
Auto-submit timesheet on due date |
Submits the timesheet automatically when it is due. This option is often enabled for CloudClock users, so they don’t need access to the Replicon web app. |
|
Choose whether to Bank Overtime Hours |
Displays a Bank Overtime Hours option in the timesheet. The user can select this option to bank any overtime hours they worked that weren’t banked automatically based on their overtime rule. |
|
Calculate pay using Pay Rules |
Applies the user's assigned pay rule to calculate overtime, rather than their overtime rule. This option is only available to customers who have pay rules functionality included in their products. |
|
Keep timesheet in sync with resource allocation |
Adds the user’s project allocated hours to display automatically in their timesheet. Timesheet hours update when allocations are updated. |
|
Show Timesheet Entry Custom Field#1-5 |
Display the timesheet entry-level custom fields corresponding to the field numbers you select. Entry-level custom fields display in comment bubbles or in a timesheet column, depending on how these fields were configured. |
|
Show Timesheet Custom Field#1-5 |
Display the timesheet-level custom fields corresponding to the field numbers you select. Timesheet-level custom fields display beneath the main timesheet data entry table. |
FAQs
Why don’t my timesheet template changes appear in the timesheet?
Changes you make to a timesheet template are only reflected in timesheets that are generated after you make the change. If you need a change to apply to an existing timesheet, you’ll need to delete and regenerate it.
Related links
Creating overtime rules
Overtime rule examples
Setting up overtime banking
How Replicon timesheets work
Deleting and regenerating a timesheet