Setting up timesheet autofill and quick fill population methods
These features are only available for timesheets based on the Configurable timesheet format.
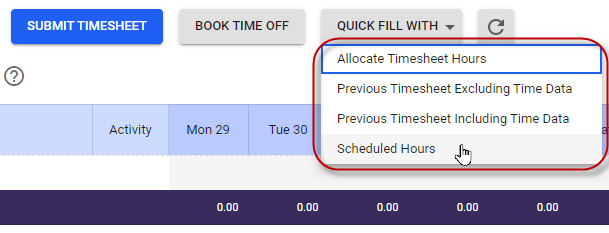
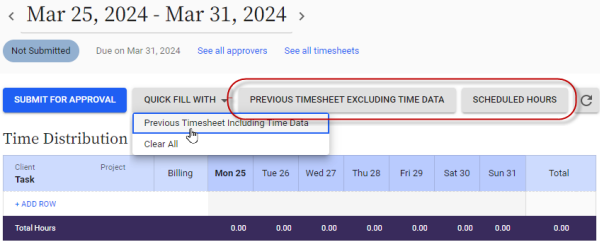
Timesheet users can click the Quick Fill With button available at the top of their timesheet to automatically add data to the timesheet. This can save them time when filling out their timesheet.
By default, users have access to four population methods that can quick fill data from past timesheets or from their schedule, or can allocate recorded hours to projects, tasks, and activities in a timesheet. But, you can customize which of these options are available for each timesheet template.
Finally, you can choose a population method that will autofill a new timesheet when it is first generated.
About timesheet population methods
The following timesheet population methods are available.
|
Method |
This method... |
|---|---|
|
Scheduled Hours |
If you are a shift worker or are assigned an office schedule, fills your timesheet with the hours you are scheduled to work. A rule-level parameter allows you to choose whether any existing entries are overwritten, or are added to. If office schedule users use timesheets that record their start time, you'll need to define a time when the automatic entry starts when setting up the rule. |
|
Previous Timesheet Including Time Data |
Copies the projects, tasks, activities, row-associated custom fields, time entries, and any custom field data from your previous timesheet. A rule-level parameter allows you to choose whether any existing entries are overwritten, or are added to. |
|
Previous Timesheet Excluding Time Data |
Copies the projects, tasks, activities, and row-associated custom fields from your previous timesheet |
|
Allocate Timesheet Hours |
Allocates hours entered against projects, tasks, and activities to their time distribution grid, in chronological order |
Configuring which population methods are available
By default, all four population methods are available when the user clicks the Quick Fill With button on their timesheets.
You can, however, override the default and choose which methods are available, for each timesheet template.
You can also select up to three methods to appear as separate buttons on their timesheet, if you want. Enabling population methods as buttons makes them easier to see and access, which should result in greater use of these options.
To customize the available quick fill methods:
- Go to Administration > Timesheets > Timesheet Templates.
- Click the template you want to update.
- Scroll down to the Time Entry Quick Fill Options section.
- In the Quick Fill Options drop-down, click Selected Timesheet Population Methods.
This opens a Selected Population Methods field.
- Click the Add Timesheet Population Methods link and select a population method to display.
If you want this method to appear as a separate button on the user's timesheet, choose Separate Button from the drop-down on the right.
- Click the link to add more methods. You can add as many as you need.
- Click Save.
The new template options will now apply to everyone assigned that template in their User Profile. That is, only the population methods you selected will display when a user assigned that template clicks the Quick Fill With button in their timesheets.
Selecting an Auto Fill method for timesheets
If you select an auto fill method in a timesheet template, each time an employee assigned that template accesses a new timesheet, it will be pre-filled with data based on that method.
Enabling auto fill does not limit which options are available when the user clicks Quick Fill With in their timesheet. Configure the Quick Fill settings if you want to limit which options display.
To assign an auto fill method:
- Go to Administration > Timesheets > Timesheet Templates.
- Add or open the template you want to update.
- Select a method from the Auto Fill Timesheet With drop-down.
- Click Save.
Customizing population method rules and messaging
The four basic types of timesheet population methods are defined by default, and customers typically don't need to customize them.
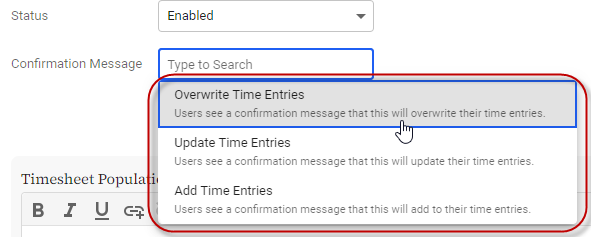
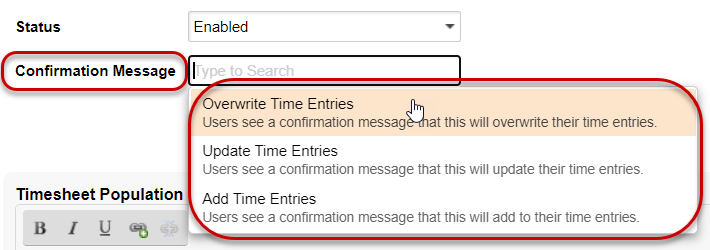
But, some of the rules offer a couple of configurable options that you can modify, including a retain vs overwrite option.
You can also update the confirmation message that displays -- you might want to do this if you've updated the retain vs overwrite option, so the text of the message matches the option you chose.
To configure a timesheet population method:
- Go to Administration > Timesheets > Timesheet Population Methods.
- Click the Name of the population method.
- Set the Status to Enabled.
- Configure the rule’s parameters, if available.
- In the Confirmation Message field, typically one whose message matches the parameters you've chosen for the rule.
- Click Save.
Talk to your Customer Success manager if you need custom population methods developed for your system.
Related topics
How Replicon and Polaris timesheets work
Time tracking setup checklist
Setting up timesheets (video)
Setting up timesheet templates
Deleting and regenerating a timesheet