Filling out timesheets for a crew
You can use Replicon’s crew timesheet to record and allocate hours for your entire crew all at once. Crew timesheet is available in Replicon Mobile, for use on tablets or phones, and in Replicon’s web app. Note that the mobile version is optimized for use with tablets.
Overview
When recording time for your team:
- First, you'll need to choose which users show in the crew timesheet.
- Then, you'll enter times for the workers you manage, and allocate hours to the correct job codes (projects, tasks, or activities).
Or, workers might record hours themselves, via punching. In this case, you'll only be responsible for allocating hours
- Finally, you'll submit timesheets for those you manage.
Refer to the bottom of this page for FAQs on using the crew timesheet.
Refer to How crew timesheets work for more information.
To access your crew timesheet using Replicon Mobile, tap Dashboard, and then tap View Crew Time.
Crew timesheet does not support offline use, so you’ll need data or wi-fi to use this functionality via Replicon Mobile.
A tour of the crew timesheet
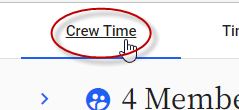
To open your crew timesheet, go to Team > Crew Time.
Viewing a timesheet card
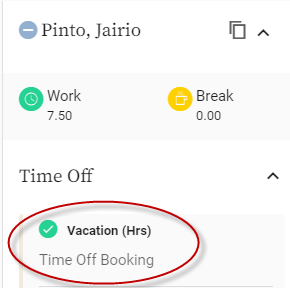
Each user in your view has a ‘card’, representing their timesheet for that day.
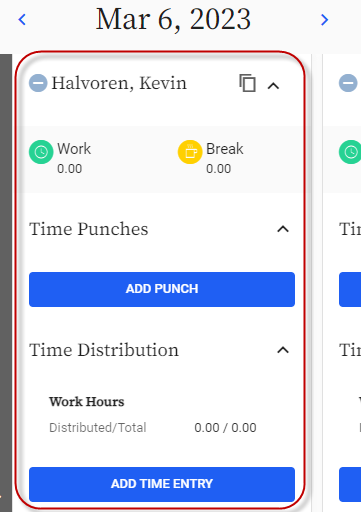
The circle displays the timesheet’s approval status.
![]()
The ![]() icon allows you to copy data from one user's timesheet to timesheets belonging to other users.
icon allows you to copy data from one user's timesheet to timesheets belonging to other users.
![]()
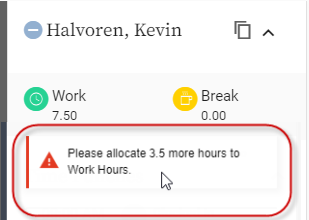
If a validation error or warning has been triggered for a timesheet, you’ll see the message here.
The Add Punch and Add Time Entry buttons that display on the cards allow you to enter time for this user (and select additional users to copy the entry to).
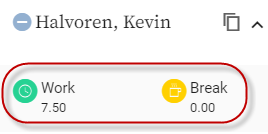
These icons show the total hours worked and break hours for the day.
If the worker has time off booked for the day, it will display on their card, so you can plan around it.
Display settings
Some cards for the day may not fit on the screen. To view those cards, click or tap anywhere on any card, then drag right or left. Or, click the < or > arrow at either edge of the page. If no arrow displays, no more users are available at that side of the page.
![]()
Use this ![]() icon to add or remove users from the daily view, to reflect changes in team membership.
icon to add or remove users from the daily view, to reflect changes in team membership.
![]()
To hide the mass add and copy panel on the left, click the <. This can give you more space when you’re not mass adding.
![]()
To hide the hours summary and any validation messages, click the ![]() for that section. This can give you more room to work on allocations.
for that section. This can give you more room to work on allocations.
![]()
Similarly, to hide Add Punch and Add Time Entry buttons on cards, click the ^ icons for those sections; this can give you more space.
Choosing workers for your team
As a crew manager, you’ve been given permission to manage timesheets belonging to certain users in your Replicon system. You may manage those you supervise, or some other group of users – often defined by location – for whom you are an assigned team manager.
From this sub-set of Replicon users, you can choose who appears on your crew timesheet. You might want to change which employee cards are visible based on who's working at your site or on your team each day.
Adding users to your team
When you first access your crew timesheet, no user timesheet cards will display. To add users to your team:
- Go to Team > Crew Time.
- Click Add Team Member.
- Select the members you want to add, and click Set Team. Use the search field, if necessary.
Members you select will display on your Crew Time view.
Updating who’s on your team
If your team membership changes, either rarely, or from one day to the next, you can update which members are available on your crew timesheet. Your selection will update the view for all days, but will not affect the data that is saved each day.
Only visible users will be available in mass actions.
To update your team:
- Click the
 icon in the top of the page.
 - Select or unselect users, to add or remove team members.
- Click Set Team.
Adding timesheet entries
There are a few ways to add time entries using your crew timesheet. You can add entries for multiple users you select, or for a single user.
A quick and accurate method for recording time is to:
- Add entries to a single user's timesheet.
- Check the entries to ensure they're correct.
- Copy that user's entries to additional users' timesheets.
You can only mass add or copy data if timesheets use the same timesheet format. For example, all of the timesheets must use the In/Out + Allocation format, or all must use the Punch Timesheet format.
For project users, the crew timesheet assumes each worker has the same projects, tasks, and activities assigned to them. If you make an entry against a project the user isn’t assigned, that entry will be added successfully to the user's timesheet, with no validation error.
Adding entries
To add time to timesheets:
- Click Add In/Out Entries or Add Time Entries in the panel on the left-hand side of the page, or
Click Add In/Out Entry or Add Time Entry on a specific user’s card.
- Enter the time you want to record on the timesheet, by entering in and out times, or the duration worked.
- If you added a duration, you can allocate (i.e. assign) the hours using the Project, Task, Billing, or Activity fields.
- From the panel on the right-hand side of the dialog, select or deselect employee names to assign the entry to other users’ timesheets.
All employees are enabled by default if you used the Add Time Entries button; If you selected Add Time Entry for a single user, only their name is enabled by default.
- Click Add.
You can add as many entries as need to a card.
You can edit an individual entry by clicking it. Mass edit is not available, though you can mass add and overwrite existing entries.
Copying entries
To save time when adding entries, you can copy:
- Entries from a single user's card to one or more other users' cards, or
- A user's past entries to a timesheet card
Copy options aren’t compatible with punch format timesheets.
Copying a user's entries to others
- Enter data for a single user.
- Click the
 icon for that user.
![]()
- From the right-hand side of the dialog that displays, select which users you want to copy that user's entries to.
- Click Copy.
All entries from the card you selected will be copied to that day's cards for the user's you select, overwriting any previous entries.
Copying a user's past entries to their own timesheet
To copy entries:
- Click Copy Entries in the left panel.
- Complete the fields in the dialog that displays. You can choose:
- Previous Day to copy entries from any preceding day; choose the day using the Date field.
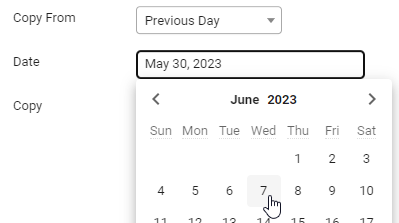
You can choose whether to copy just projects and tasks, or to copy projects and their time entries.
- One of the copy options available on individual timesheets (Scheduled Hours, Previous Timesheet Excluding Time Data, Previous Timesheet Including Time Data, Allocate Timesheet Hours).
Refer to Auto-filling your timesheet for more information about these options.
These population options overwrite all data in a timesheet period, not just entries for that day.
- From the panel on the right-hand side of the dialog, choose which users' timesheets will be updated.
- Click Copy.
These options will overwrite existing data. Look at the warning notes, and ensure you want to carry out the copy action before clicking Copy.
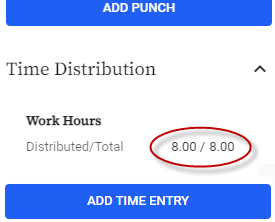
Allocating hours that were added
If you record work durations, instead of recording in and out times, then you can allocate hours to projects, tasks, or activities when you enter the hours.
However, if you record in and out times, or workers punch in and out themselves to record their work hours, you'll have to take an additional step to allocate hours worked.
To allocate hours:
- Under the Time Distribution heading, in the panel on the left-hand side of the page, click Add Time Entries , or
Click Add Time Entry on a specific user’s card.
- In the Hours field, enter the number of hours you want to allocate.
- Select the applicable Project, Task, and Billing, or Activity fields.
- From the panel on the right-hand side of the dialog, select or deselect employee names to add this allocation to other timesheets.
All employees are enabled by default if you used the Add Time Entries button; If you selected Add Time Entry for a single user, only their name is enabled by default.
- Click Add.
- Repeat steps 1 to 5 for each project, task, or activity you need to allocate hours to.
You'll know allocation is complete when the hours distributed matches the total hours recorded.
Once you've allocated some time on a card, you can click the ![]() icon and you'll be allowed to update the hours recorded against that project, task, or activity. This allows you to quickly fix allocation errors.
icon and you'll be allowed to update the hours recorded against that project, task, or activity. This allows you to quickly fix allocation errors.
Submitting crew timesheets
You can use the Submit Timesheets button located on the left panel to submit an entire timesheet for all workers with cards visible at that moment. You can submit timesheets with different formats and timesheet periods.
This button will submit entries for the whole current timesheet period, not just entries displayed for a single day. You can check the confirmation dialog to see the timesheet period for each user.
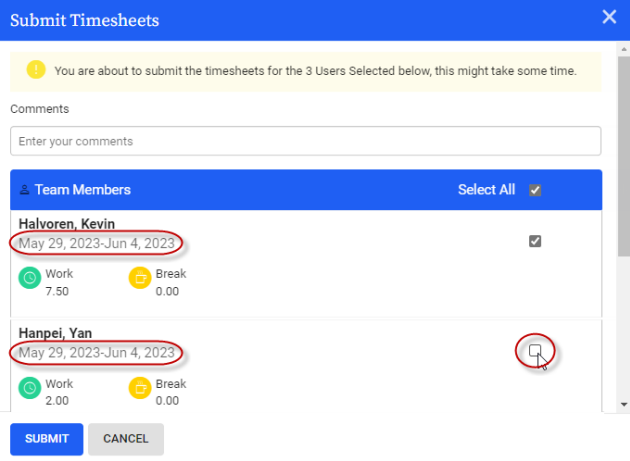
You can also deselect any timesheets you don't want to submit, because they're incomplete, or if you need to correct or confirm something before submitting.
FAQs
Why do I see hours in a timesheet that I didn’t enter?
The owners of timesheets that appear in your crew timesheet may have access to their timesheets, as might another crew managers, supervisors, payroll, cost, or billing managers. Individuals assigned any of these roles may have permission to add entries and edit timesheets.
Can I mass edit entries?
No, if you have the correct permissions, you can edit individual entries, but you can’t mass edit them. You can mass add entries, however.
Is there a maximum number of workers that can be included on the crew timesheet?
There is no fixed maximum. However, ease of use and system performance may decrease if you’re working with over 100 users on one timesheet.
Why aren’t all workers I manage available to add?
If you can’t add certain employees you supervise or who belong to your team manager groups, they might be using an unsupported timesheet format. Only configurable timesheets can be used with the crew timesheet.
Can I submit just a single timesheet?
To submit a single timesheet, either add only that user to your crew timesheet view before clicking Submit Timesheets, or deselect all other users after clicking that button. Or, you can go to Team > Timesheets, and submit the timesheet from there.
How can I reopen a submitted timesheet that displays?
If you have reopen permission, you can reopen items at Team > Timesheets.
Why are buttons in the left panel disabled?
Mass edit functionality is only available if all of the workers you've selected use the same timesheet format (e.g. all in/out or all punch timesheets.)
Will entries be copied to workers who don't display on my crew timesheet?
Entries will only be copied to selected team members, and only members added to your team view are available to select.
Related links
How crew timesheets work
Setting up crew timesheets
Setting up team managers
How timesheets work
Editing or submitting time on behalf of a report