Setting up timesheet periods
In 2020, we began offering an optional upgrade to a new version of timesheet periods.
Refer to All about Replicon’s optional upgrade for departments, employee types, and timesheet periods for information on upgrading.
Looking for help with this feature in Polaris? Check out Setting up timesheet periods in the Polaris help.
Timesheet periods determine the length of user timesheets.
They should parallel either your organization’s pay periods or billing cycle so that timesheet data is available when needed for generating payroll or for invoicing clients.
How timesheet periods are assigned to users
If you've upgraded...
You'll create timesheet periods you can assign to each user directly in their user profile.
If you haven't upgraded yet...
You'll create timesheet periods for groups of users -- everyone in your system, everyone in a department, or everyone assigned a certain employee type.
You'll assign one of these options (system, department, or employee type) to each user in their user profile.
A System timesheet period is assigned to new users by default. We recommend using a single system timesheet period for all users, since this is the easiest method to manage.
If you change this to Employee Type or Department, the user’s setting for the Employee Type or Department field in their user profile determines the specific timesheet period in effect.
Adding a timesheet period
To add a timesheet period, go to Administration > Timesheets > Timesheet Periods.
If separate System, Employee Type, and Department tabs exist at the top of the page:
- Select the tab for the type of period you want to create – either System, Employee Type, or Department.
- Click Add Timesheet Period.
- Select the employee type or department the timesheet period will apply to, if applicable.
- Select the timesheet period type, and complete the date fields that apply to that type.
The timesheet period will come into effect automatically for that group of users on the effective date you assign.
- Click Save.
If no tabs exist at the top of the page:
- Click Add Timesheet Period.
- Give the period a name, and select the period type.
- Select any required dates for that type. Note that effective dates for each user are assigned in user profiles.
- If desired, use the Timesheets can be entered field to update the number of months in advance timesheets based on this timesheet period can be completed.
- Click Save.
Default timesheet periods exist that may meet your requirements.
About the timesheet period types
Your organization's timesheet period should parallel either your pay periods or your billing cycle. Below are the types of timesheet periods available in Replicon.
|
Timesheet Period Type |
Replicon will generate a new timesheet... |
|---|---|
|
Weekly |
Each week, beginning on the day of the week you choose If you've upgraded, you can use the At the end of the month field to have each timesheet period adjust, so they always stay within the boundaries of a month. Those who haven't upgraded can use the default Weekly without crossing months format. |
|
BiWeekly |
Every two weeks, beginning on the day of the week and date you choose. The first period begins on the reference start date, then a period begins every two weeks thereafter. |
|
SemiMonthly |
Twice a month, on the two calendar days you select |
|
Monthly |
Each month, beginning on the day of the month and date you select |
|
Using the custom start and end dates you specify. After the first timesheet period, the following timesheets will use the same span of time, until a new timesheet period comes into effect. For example, if you use October 1st and 2nd as the timesheet period’s start and end dates, subsequent timesheet periods will run for two days each, from October 3rd to 4th, then from October 5th> to 6th, and so on. |
|
|
Each week, beginning on the first day of each week, and at the beginning of each month The first and last week of the month are shortened or lengthened, or shortened only, to ensure a timesheet period ends on the last day of each month, and all timesheet periods include at least 4 days. Refer to the FAQs below for more details. |
FAQs
How does the Weekly without crossing months format work?
Weekly without crossing months timesheet periods are intended for those using a monthly payroll period, but who want to use weekly timesheet periods to promote timely data entry. Timesheet periods flex in length to ensure all hours for a given month are submitted by the end of the month, so payroll can be calculated on time.
You have two options when setting up this type of timesheet period:
- Lengthen & shorten timesheets so they do not cross the month boundary
With this option, timesheet periods may be longer or shorter at the end of the month, with each period having at least 4 days. The variable-length periods balance each other out, with one short week bordering a long week. Therefore, there will still be a total of 52 timesheet periods in a year.
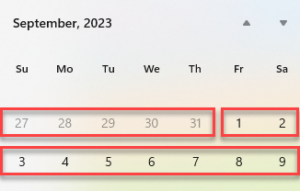
For example, timesheet periods at the end of the month would look like this:
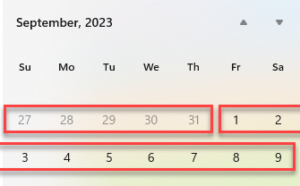
- Shorten only timesheets so they do not cross the month boundary
With the shorten only option, timesheet periods are always shortened at the end of the month, so no period is longer than a week.
For example, timesheet periods at the end of the month would look like this:
This option is often used if your employees use timesheet autofill, since the lengthen & shorten option can cause issues with autofill. But, note that with this option, you'll end up with more than 52 timesheet periods in a year.
Why might we use a manual timesheet period?
You might need to use a manual timesheet period if a time span occurs during which your organization will not follow the standard timesheet period schedule.
For example, if you are changing your payroll schedule or billing cycle, you may need to use a manual timesheet as a bridge between regularly scheduled timesheet periods.
How do we create a daily timesheet period?
You can create a daily or one day timesheet period using a manual-type timesheet period. Make the timesheet period's end date the same as its start date.
Is it possible to assign no timesheet period, when a user takes a leave of absence?
Yes, if you're using our new timesheet periods.
Can we change a timesheet period from Sunday to Saturday, to Monday to Sunday?
Yes. To do this, simply add a new timesheet period, using the new Monday to Sunday range. Replicon will create a transition timesheet period with one extra day in it to accommodate the change. If you’re using our updated timesheet periods, you can simply edit an existing period.
Why do timesheets remain the same when we change the timesheet period?
Any timesheet that was generated before the timesheet period was changed will not reflect the new timesheet period. To have the new timesheet period apply, you'll need to delete the timesheet, and have the owner recreate it.
Related links
How Replicon timesheets work
Time tracking setup checklist
Setting up timesheet templates
Deleting and regenerating a timesheet