Setting up groups
You can set up customizable types of groups to organize employees and projects – departments, employee types, locations, divisions, service centers(1), and cost centers. Groups are primarily used to limit access to users and projects.
You can rename these four customizable groups, if necessary, to better reflect your company’s organizational structure.
The customizable group types may be disabled by default. You can enable any ones you plan to use.
About group structures
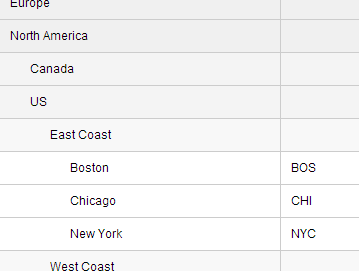
For each group type, you can create a flat set of groups or a hierarchy of groups, up to seven levels deep. For example, for the location group type, you could create groups named Europe, North America, Asia, and then include sub-groups under each.
How groups are assigned to users
Users are assigned to groups in their user profiles. Projects are assigned to groups using the Project Info dialog for each project.
Each user or project can only be assigned one option for each type of group. For example, each user can be assigned only one location.
When you assign a group to a user, you specify an effective date (the initial date is set by default). This allows you to keep a historical record of each user's assignments.
Filtering, assigning, and limiting access by groups
Once employees and projects are organized into groups, you can control which groups a user has access to. Currently, you can limit access for the following roles:
- Administrator
- Cost Manager, and
- Project Management
You can also limit data for the User role by group; However, in that case, setting up limits does not allow the user to access other users' items, but instead limits which users they can send scheduled reports to, share reports with, or assign as a substitute.
Refer to Limiting which groups a user can access for more information.
Administrators can also filter data by user group. Project managers can filter by group when creating project teams.
Creating a user group
To create a user group:
- Go to Administration > Employees and Organization.
- Click the name of the type of group you’d like to create – either Departments, Employee Types, Divisions, Locations, Service Centers, or Cost Centers.
- Click the Add <Group Type name> button (for example, Add Division or Add Location), complete the fields, and click Add.
To add a sub-group to a group:
- Find the group you want to add a sub-group to, and click the
 icon in that row.
 - Complete the fields in the bubble that displays, and click Add.
Once you’ve set up all of your groups, you can assign groups to users in their user profiles.
Moving a group within its hierarchy
Occasionally, you might need to move a group within its group hierarchy – say, for example, if your company is reorganizing. To move a group:
- Go to Administration > Employees and Organization.
- Find the name of the group you'd like to move, and click the icon located next to it.
- From the drop-down list, find the group's new parent, then click Save.
The group, and all child groups under it, will move to the new parent, and any references to that group structure (e.g. in columns and filters) will automatically update.
You can't move a group to a lower position in its own hierarchy.
If you move a group to a parent group that a user doesn't have access to, they may or may not retain access. Refer to the If we move a group, will managers allowed access to that group still have access? FAQ below for more information.
Giving a group type a custom name
You can update the name of any group type to match your organization’s usage. The name you choose will display in place of the default group type name throughout the application.
To give a group type a custom name:
- Go to Administration > Employees and Organization.
- Click the name of the group type you’d like to rename.
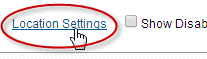
- Click the <Group Type name> Settings link, in the top, right-hand corner of the page.
- Enter singular and plural forms of the new group type name, and click Save.
Enabling or disabling group types
You can disable group types that you are not actively using. Once a group is disabled, filters and data visibility limitations based on that group will no longer apply.
To enable or disable a group type:
- Go to Administration > Employees and Organization.
- Click the name of the group type you’d like to enable or disable.
- Click the <Group Type name> Settings link, in the top, right-hand corner of the page.
- Choose either Enabled or Disabled from the Status field, as applicable, and click Save.
FAQs
Can I disable individual groups or part of a group hierarchy?
Yes. To do this, click the ![]() icon for the top level of the branch you want to disable, select Disabled from the Status field, and click Save. The top level branch and all of the ‘child’ groups under it will be disabled.
icon for the top level of the branch you want to disable, select Disabled from the Status field, and click Save. The top level branch and all of the ‘child’ groups under it will be disabled.
We currently use a drop-down user custom field to define one of the group types. How would using a dedicated group type be different?
Users typically can’t filter by a custom field, custom fields cannot have a hierarchical structure, and you can’t control user data visibility based on a custom field assignment. Additionally, you can't keep a historical record of a user's custom field assignments.
Our departments are sub-sets of our locations. How should we organize our users?
You could create departments as a sub-group within the locations group type, or you could treat departments and locations as independent group types.
I created some groups. Why can't I see them anywhere?
Make sure the group type is enabled. If the group type is disabled, it won't be shown in user profiles and won't be available for filtering.
Can we delete groups that we aren’t using?
No, you can only disable groups you’re not using. Disabled groups are still shown on the Administration landing page (in gray) but are not shown throughout the rest of the application.
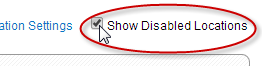
Why can’t I see the groups I’ve disabled?
Check that the Show Disabled Group Type check box located at the top, right-hand corner of the Administration > <Group type name> page is enabled.
If we move a group, will managers allowed access to that group still have access?
Whether or not a user has access to depends on what check boxes are enabled.
If a parent group is checked, they'll have access to all of its child groups, even ones that are unchecked.
For example, if US is checked for a user, but all states under it are unchecked, they'll still have access to all of those states.
So, if you move a group and you want a user to retain access, ensure its parent group is checked, or the group you moved is checked.
Related links
Limiting which groups a user can access
Using groups to limit data access (video)
About the user profile fields