Using data import to mass add, update, and delete data
Looking for help with this feature in Polaris PSA or Polaris PPM? Check out Using data import to mass add, update, and delete data in the Polaris help.
Our data import feature allows you to mass add, update, and delete data from your Replicon instance by importing a CSV file you prepare.
Unlike our RIA import utility, the import feature is accessed from within the Replicon web app.
Currently, the in-app data import feature can be used to import of the following data types:
If you need to import other types of data, you may be able to carry out your import using the Replicon Import Add-in (RIA). RIA supports import of time, time off, expenses, and certain system-level settings.
Changes you make using the data import feature cannot be reversed. Therefore, use caution when working with this feature, as it allows you to easily make changes to large amounts of live data that cannot be undone.
Enabling access to the import feature
If the Import Data link isn’t available at the bottom of the Administration page, you’ll need to enable the feature.
To do this, enable Data Imports permission in all Administrator permission sets assigned to users who need access to the data import feature.
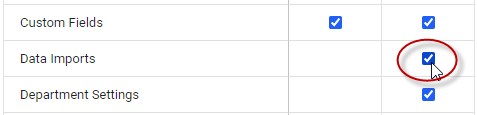
If you're allowing access for a project manager and they shouldn't have any other administration permissions, you can assign them an Administrator permission set with only Data imports permission enabled.
Users can only import data they can access based on their assigned permissions
For example, an administrator without activities permissions won't be able to use the Activity import. And, if they're missing certain user settings permissions, the corresponding fields won't be available in the import template. For example, if an administrator lacks permission to assign supervisors, they won't be able to import the Supervisor field when using the User import.
Data imports cannot be reverted
Any changes a user makes – including deletions and updates – are permanent. Be certain users know the consequences of using this feature before you grant them access.
Setting up CSV import files
The biggest part of importing data is setting up your CSV import files.
Each type of import is carried out using a separate CSV file, so you can’t create and update items during a single import, for example. You can, however, import multiple items using a single file. For example, you can add many users during a single import.
To set up templates:
- Download the template for the import you want to carry out.
To do this:
-
- Go to Administration > Integration > Data Import.
- Select the type of import from the Data Type and Operation fields located at the top of the page.
- Click Download a sample file.
- Enter the data you want to add or update in the template.
When creating an import CSV, note that:
-
-
- If you’re referencing existing data in Replicon – for example, if you’re assigning a client, project manager, or billing type to a project – that data must already exist in Replicon, and the values you include in your CSV must exactly match the values in Replicon.
- Entries are not case sensitive.
- You can find the valid options for any fixed Replicon field, and required fields for each import, here or in the templates downloaded from the links above.
- When creating data, if you exclude a field that isn't required, it will be set to the Replicon default for that field.
- If you attempt to delete an item that is in use (for example, a user who has timesheets), that item will be disabled instead of deleted.
- Fields that support effective dates will overwrite any existing dates; they will not add a new effective date.
- In your import CSV, you only need to include required columns and columns for data you want to add or update. If you’re not adding or updating a given field, you can omit it from the file.
- Columns can be listed in any order, and you can leave blank rows and columns – unassigned columns and blank rows will be ignored.
-
Take advantage of Excel's Autofill feature to easily copy data from one row to the next.
- Save your CSV file with a name and to a location you’ll remember.
You might want to reuse the file in the future, so give it a meaningful name.
Carrying out an import
You can use the data import feature to create (add), update, or delete (remove) data.
To carry out a data import:
- Go to Administration > Integration > Data Import.
- Select the data you want to import from these fields:
-
-
- Data Type - the type of data you want to import
- Operation - what you want to do to that data, either create it, update it, or delete it
-
If the type of import you’ve selected supports date fields, a File date format field will appear. The date format you choose must match the format you used for date fields in your import CSV. You can select the format now, or after you’ve uploaded the CSV file.
- Click Upload CSV file, and find the completed CSV import file you prepared.
Once the file is uploaded, the file name should display next to the Upload CSV file button.
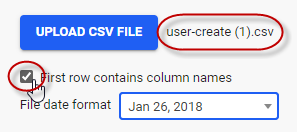
Ensure the First row contains column names check box is set appropriately, so the import knows whether to import or ignore the column names.
- Handle any validation issues that are already marked. Then click Validate, and fix any additional errors detected.
You will need to re-upload the file after fixing issues detected after clicking Validate.
- Click Import.
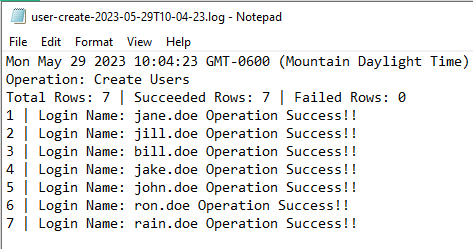
You’ll see the row by row import of data, with each successfully-imported row turning green.
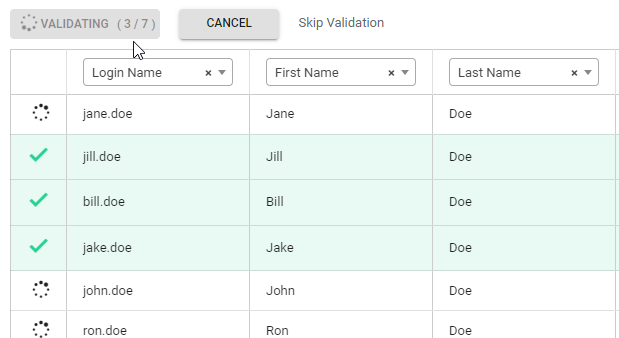
Import of rows may not happen in order, since the import identifies data dependencies, importing parent data before child data.
The import is not all or nothing – some rows may be imported while other might fail to import.
When the import is complete, you’ll see a message showing how many rows were successfully imported at the top of the page.
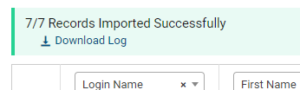
Click Download Log to view a summary of what was imported, and more details about why some rows failed to import.
Some data can only be validated once the import is underway, therefore you may see additional validation messages after you click Import. Refer to Handling validation issues for more information.
Handling validation issues
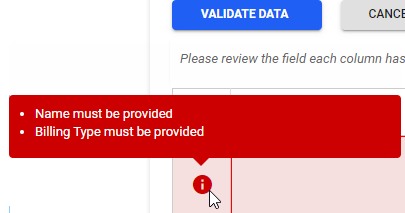
Data you include in your import CSV file is checked to ensure only valid data is being added to your system.
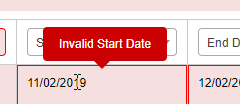
Issues with column headers, dates, and cell formats display before you click Validate. Errors involving your existing data are detected and marked after you click Validate. Any row that includes an error will be shaded red.
Refer to the sections below for information on fixing different types of issues.
Fixing data validation issues
An icon displays beside rows that include error data. Hover over the icon to see details about the error. Or, if an issue displays during import, you can download the log file for more details.
Common errors include:
- Required fields are missing from the import
- Parent data for a field included in the import is missing from Replicon
- Data doesn't exactly match Replicon fixed values
- Data doesn't exactly match values you've set up in Replicon
- The data you're trying to import already exists in Replicon
- There are formatting errors (e.g. spaces between pipe separators)
Refer to the Import fields and formats section below for information on fixing and avoiding these issues.
Issues detected prior to import must be fixed before you can carry out the import.
To fix a data error:
- Open the import's CSV file.
- Fix the issue and save the file.
- Re-upload the file so Replicon can read the changes, and click Import.
You don’t need to delete rows that were already imported successfully.
Fixing column header validation issues
When you first upload an import CSV, the names of its column headers will be checked by Replicon to ensure they match fields supported by that import, and to ensure all required columns are present.
If a column in your file doesn’t include a heading, or includes a heading not supported by the import you chose, the heading will show as Unassigned on the import page, and an error message will display at the top of the page.
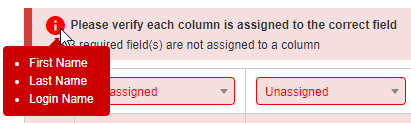
If you hover over the header, you’ll see the name you included in the CSV file.
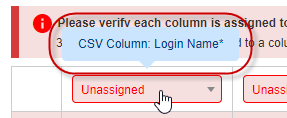
You can click the small arrow inside the header box, and a list of columns that are supported will display for you to choose from.
Note that you can carry out an import that includes unassigned columns – they will just be ignored.
Fixing date validation issues
The format of any date fields in your CSV file must match the format selected in the Date Format field at the top of the import page.
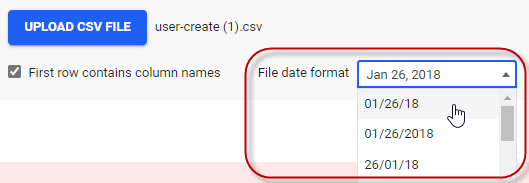
Date format mismatches will be marked as soon as you upload your file.
You can fix these by choosing the matching format from the Date Format field, or by updating the formats in your CSV.
To change a cell's date format in Excel:
- Right-click the cell and select Format Cells.
- Ensure the Number tab is selected, then choose Date from the Category list.
- Select the format you want from the Type list that displays.
FAQs
Can I roll back change I made?
No, the data import feature has no roll-back capability. Be certain you know what you’re doing before making changes.
Do we have to use the csv format?
Yes. That’s the only format that’s currently supported.
Can we use the data import feature to update names of required fields?
No, you’ll have to do that manually from within the application.
What is RIA? How does it differ from this import feature?
The RIA import utility is an Excel add-on that currently supports import of more types of data than the web-based import. But, its downsides are that it's an external add-on that must be installed before it can be used. This is an issue since some companies have restrictions the prevent installation of add-ons, plus it can't be used on Macs.
Import fields and formats
Group
These imports allow you to create new groups, update settings for existing groups, or delete existing groups. A separate import is available for each type of group you have enabled in your system (location, cost center, etc).
Field name |
Example |
Notes |
---|---|---|
Name |
North America|Canada|Ontario|Toronto |
*Required Use the pipe symbol (|) to separate group levels Parent groups must already exist in Replicon, but you can create each level of a group hierarchy in one import, using separate rows for each level |
Code |
TO |
|
Description |
City of Toronto |
|
Enabled |
True |
True or False are valid |
Client
These imports allow you to create new clients, update details of existing clients, or delete existing clients.
Field name |
Example |
Notes |
---|---|---|
Name |
Western Brothers |
*Required Character limit: 255 |
Code |
WB |
*Required only if code is set as the unique client identifier |
Description |
Western Brothers client, our first client |
|
Client Manager |
jane.existingcm |
Login name of a Replicon user with client manager permissions |
Client Contact |
Jim Western |
|
Client Email |
jim.western@westernbrothers.com |
Character limit: 255 |
Fax |
555-555-5555 |
|
Phone |
555-555-5555 |
|
Status |
Enabled |
True or False are valid |
Website |
www.westernbrothers.com |
|
Client Street |
123 Big Street |
|
Client City |
New York |
|
Client State/Province |
NY |
|
Client Country |
USA |
|
Client Zip/Postal code |
13243 |
|
Billing Street |
123 Big Street |
|
Billing City |
New York |
|
Billing State/Province |
NY |
|
Billing Country |
USA |
|
Billing Zip/Postal code |
13243 |
|
Billing Email |
bill@westernbrothers.com |
Character limit: 255 |
Billing Fax |
555-555-5555 |
|
Billing Phone |
555-555-5555 |
|
Billing Website |
www.westernbrothers.com |
|
Billing Rates |
Project Rate|User Rate|Consultant|Developer|Project Manager |
The names of one or more rates that exist in Replicon If importing multiple rates, use the pipe symbol (|) to separate the names If you update rates, the new rates will completely overwrite any existing rates set for the client |
Expense Codes |
Car Rental|Airfare|Meals|Hotel |
Use the pipe symbol (|) to separate the expense code names Each expense code must already be set up in Replicon |
Tax Profile |
California |
The tax profile must already be set up in Replicon |
Project
These imports allow you to create new projects, update details of existing projects, or delete existing projects.
Field name |
Example |
Notes |
---|---|---|
Name |
Landmark renovation |
*Required Character limit: 255 |
Code |
P-22 |
*Required only if code is set as the unique project identifier Character limit: 50 |
Start Date |
26/01/2020 |
Date formatted to match the one selected from the Date Field |
End Date |
24/02/2020 |
Date formatted to match the one selected from the Date Field |
Description |
Landmark interior renovation – design and construction |
|
Clients |
Advantage Technologies|Big Game Inc|Joan Arc Inc |
Names of one or more clients that exist in Replicon If importing multiple clients, use the pipe symbol (|) to separate the client names Enter clients on separate lines if you’re assigning a Client Billing Allocation Percentage |
Client Billing Allocation Method |
User’s Choice |
*Required if creating a multi-client project User's Choice or Allocated Between are valid
|
Client Billing Allocation Percentage |
70 |
*Required if creating an Allocated Between project Specify the percentage to allocate to the client given in that row; don't include a % symbol |
Program |
Renovations |
Must match a program name that already exists in Replicon |
Project Manager |
jane.existingprojectmanager |
Login name of a Replicon user with project manager permissions |
Project Leader Approval Required |
False |
True or False are valid |
Cost Type |
Capex |
Capex or Opex are valid |
Allow Time Entry |
True |
True or False are valid |
Billing Rate Time Period |
Hourly |
Hourly, Daily, or Monthly Fixed are valid |
Billing Rates |
Project Rate|Consultant|Architect |
The names of one or more rates that exist in Replicon If importing multiple rates, use the pipe symbol (|) to separate the names When updating rates, the new rates will completely overwrite any existing rates set for the client |
Billing Type |
Time and Material |
*Required for Create operation only Time and Material or Fixed Bid are valid |
Estimated Cost Amount |
40000 |
|
Estimated Cost Currency |
$ |
Currency symbol for the Estimated Cost Amount value |
Estimated Hours |
500 |
|
Fixed Bid Billing Amount |
50000 |
|
Fixed Bid Billing Currency |
£ |
Currency symbol for the Fixed Bid Billing Amount value |
Fixed Bid Billing Frequency |
Daily |
Hourly, Daily, or Monthly Fixed are valid |
Invoice Currency |
¥ |
Currency symbol for the amounts on the invoice |
Time & Expense Entry |
Billable |
Billable, Billable & Non-Billable, and Non-Billable are valid |
Status |
In Progress |
Tentative, In Progress, Completed, Deferred, Cancelled, and Archived are valid
|
Task
These imports allow you to create new tasks for existing projects, update details of existing tasks, or delete existing tasks.
Field name |
Example |
Notes |
---|---|---|
Name |
Phase II |Stage I||Task 2 |
*Required Use the pipe symbol (|) to separate levels in the task name hierarchy Parent tasks must already exist in Replicon, but you can create each level of a hierarchy in one import Character limit: 255 |
Code |
T-34 |
Character limit: 50 |
Project |
Landmark renovation |
*Required Must match a project that already exists |
Start Date |
26/01/2020 |
Date formatted to match the one selected from the Date Field |
End Date |
24/02/2020 |
Date formatted to match the one selected from the Date Field |
Description |
Task 2 of Stage I |
|
Time And Expense Entry Type |
Billable |
*Required for Create operation only Billable, Billable & Non-Billable, and Non-Billable are valid |
Allow Time Entry |
True |
True or False are valid |
Estimated Hours |
40 |
|
Cost Type |
Opex |
Capex or Opex are valid |
Estimated Cost |
5000 |
|
Estimated Cost Currency |
$ |
Currency symbol for the Estimated Cost value |
Is Closed |
False |
True or False are valid |
User
These imports allow you to create new users, update details of existing users, or delete existing users.
Field name |
Example |
Notes |
---|---|---|
Login Name |
jill.doe |
*Required Character limit: 255 |
First Name |
Jill |
*Required for Create operation only Character limit: 50 |
Last Name |
Doe |
*Required for Create operation only Character limit: 50 |
Display Name |
Jill D. |
|
Start Date |
26/01/2020 |
Date formatted to match the one selected from the Date Field |
End Date |
24/02/2020 |
Date formatted to match the one selected from the Date Field |
Enabled |
True |
True or False are valid |
|
jill.doe@yourcompany.com |
Character limit: 255 |
Employee Id |
1054 |
|
Department |
Company|Implementation |
Use the pipe symbol (|) to separate each level of the department name hierarchy |
Employee Type |
Contractor |
Must match the name of an employee type that already exists in Replicon |
Primary Role |
Architect |
Must match the name of a role that already exists in Replicon |
Secondary Role |
Developer |
Must match the name of a role that already exists in Replicon |
Supervisor |
jack.existingsupervisor |
Login name of a Replicon user with supervisor permissions The supervisor must already exist in Replicon If updating the supervisor, the new supervisor will not be given a new effective date, but will replace the current supervisor assignment |
Permissions |
System Administrator|Basic User |
Name of one or more permission sets that already exist in Replicon If assigning multiple sets, use a pipe symbol (|) to separate names |
Timesheet Template |
Standard Timesheet |
Must match the name of a timesheet template that already exists in Replicon |
Time Off Template |
Time Off |
Must match the name of a time off template that already exists in Replicon |
Expense Template |
Expenses |
Must match the name of an expense template that already exists in Replicon |
Punch Entry Policy |
Cloud Clock Access |
Must match the name of a punch entry policy that already exists in Replicon |
Authentication Type |
Replicon |
Replicon or SSO are valid |
Password |
Createacomplexpassword |
Must meet minimum password requirement of Good rating, and any other password requirements you’ve configured Character limit: 255 |
Licenses |
Professional Services Automation|Expense Plus |
Must match the name of a license available in Replicon If assigning multiple licenses, use a pipe symbol (|) to separate names |
Holiday Calendar |
United States |
Must match the name of a holiday calendar that already exists in Replicon |
Location |
Europe|Germany|Frankfurt |
You can assign any type of group that exists in your system, not just Location groups – use the group type name as the field name Use the pipe symbol (|) to separate each level of the group name hierarchy If updating a group, the new group will not be given a new effective date, but will replace any existing group assignments, becoming the new initial group assignment |
Time Off Types |
Vacation|Sick|Personal Leave |
Name of one or more time off types that already exist in Replicon If assigning multiple types, use a pipe symbol (|) to separate names |
Timesheet Approval Path |
Supervisor |
Must match the name of a timesheet approval path that already exists in Replicon |
TimeOff Approval Path |
Supervisor |
Must match the name of a time off approval path that already exists in Replicon |
Expense Approval Path |
Project Manager |
Must match the name of an expense approval path that already exists in Replicon |
Activity
These imports allow you to create new activities and assign them to users, update details and assignment of existing activities, or delete existing activities.
Field name |
Example |
Notes |
---|---|---|
Name |
Sales training |
*Required |
Code |
HRT |
|
Description |
Monthly training session for Sales staff |
|
Enabled |
True |
True or False are valid |
Users |
Jane.doe|jack.doe|joe.doe |
Login names of all existing Replicon users to assign this activity to Use a pipe symbol (|) to separate names |
Holiday
These imports allow you to add or delete holidays from an existing holiday calendar.
Field name |
Example |
Notes |
---|---|---|
Holiday Name |
New Year's Day |
*Required |
Holiday Date |
26/01/2020 |
*Required Date formatted to match the one selected from the Date Field |
Holiday Calendar Name |
United States |
*Required Must match the name of a holiday calendar that already exists in Replicon |
Holiday Duration |
Specific Hours |
*Required for Add operation only Full Day, Half Day, Specific number of hours, and Full Day with no Holiday Time are valid |
Hours |
4:30 |
*Required, but only if Specific number of hours is set for Holiday Duration Must use hr:min format, if not a full hour |
Automatically add Bookings |
True |
True or False are valid |
When adding to existing timesheet |
Reopen if Submitted |
Reopen if Submitted, Reopen if Approved, and Do Not Add if Approved are valid |
Project Assignment
These imports allow you to assign users, departments, groups, or placeholders to existing projects, or to remove assignments.
Field name |
Example |
Notes |
---|---|---|
Project Name |
Mobile App Development |
*Required Must match name of project that already exists in Replicon |
User |
<All> |
*Required if assigning individual users <All> or a list of Replicon login names for users with project user permission If assigning multiple users, use a pipe symbol (|) to separate names |
Department |
Company|Implementation |
*Required if assigning departments Use the pipe symbol (|) to separate each level of the department name hierarchy |
Location |
Europe|Germany|Frankfurt |
*Required if assigning groups You can assign any type of group that exists in your system, not just Location groups – use the group type name as the field name Use the pipe symbol (|) to separate each level of the name hierarchy |
Placeholder |
CRM Architects |
*Required if assigning placeholders Must match the name of a project role that already exists in Replicon |
Placeholder Index |
5 |
Number of placeholders needed Only applies if assigning placeholders; never required |
Task Assignment
These imports allow you to assign users, departments, groups, or placeholders to existing tasks, or to remove assignments.
Field name |
Example |
Notes |
---|---|---|
Task Name |
Phase II|Stage I|Task 2 |
*Required Use the pipe symbol (|) to separate levels in the task name hierarchy Must match the name of a task that already exists in Replicon |
Project |
Mobile App Development |
*Required Must match the name of a project that already exists in Replicon |
User |
<All> |
*Required if assigning individual users <All> or a list of Replicon login names for users with project user permission If assigning multiple users, use a pipe symbol (|) to separate names |
Assignment Start Date |
16/05/2021 |
*Required if assigning Assignment End Date Resource Task Allocation permission is required to import this field |
Assignment End Date |
23/07/2021 |
*Required if assigning Assignment Start Date Resource Task Allocation permission is required to import this field |
Department |
Company|Implementation |
*Required if assigning departments Use the pipe symbol (|) to separate each level of the department name hierarchy |
Location (or any other group enabled in your system) |
Europe|Germany|Frankfurt |
*Required if assigning groups Use the pipe symbol (|) to separate each level of the location name hierarchy |
Placeholder |
CRM Architects |
*Required if assigning placeholders Must match the name of a project role that already exists in Replicon Only needed if assigning placeholders |
Placeholder Index |
5 |
Number of placeholders needed Only applies if assigning placeholders; never required |
Skills
These imports allow you to create new skills, update settings for existing skills, or delete existing skills.
Field name |
Example |
Notes |
---|---|---|
Skill Name |
Python |
*Required |
Skill Category |
Coding |
*Required for Add and Update operation only The category doesn't not need to exist in Replicon; you can create a new category |
Skill Description |
Resource can code in Python |
|
Enabled |
True |
True or False are valid |
Related links
Integrating with Replicon
Understanding how third-party tools integrate with Replicon
Introduction to the Replicon API
Exporting time data using the Time Workbench
Exporting a report to Excel or PDF