Using SAML for single sign-on
Security Assertion Markup Language (SAML) is an XML-based standard for exchanging authentication data between a service provider (such as Replicon/Polaris) and an identity provider.
SAML allows users to employ web browser single sign-on (SSO) when logging in to applications. Using SSO has several advantages, including the following:
- End users don’t need to remember a unique Replicon/Polaris password, and don’t need to enter credentials when accessing Replicon/Polaris
- Managing passwords is faster and easier
For information on setting up SSO based on an OpenID Connect provider, refer to Setting up single sign-on.
For information on assigning SAML authentication settings to users, refer to Setting up users for single sign-on.
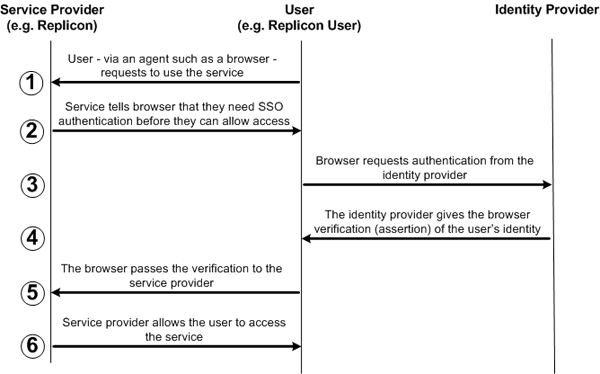
How does SAML authentication work?
To use SAML, an organization enrolls with an identity provider and then enables SAML within the service they wish to use. Once SAML is enabled, the following exchanges occur when the user tries to access the service:
Is SAML authentication secure?
If you use SAML, all user authentication is carried out through your identity provider. When the user accesses the identity provider’s website, they’re either prompted to enter their NT/AD credentials, or their browser forwards credentials they used to access their network. The user’s log-in credentials are then authenticated by the identity provider.
The identity provider then forwards the user name to the service provider (e.g. Replicon/Polaris), along with the assertion token that proves their credentials are valid. Only the user name is forwarded; Replicon never has access to the user’s login credentials.
How do I use SAML authentication with Replicon/Polaris?
To use SAML authentication with Replicon/Polaris, you must first be enrolled with an identity provider who will supply you with the following:
- a SAML key - establishes that Replicon/Polaris can trust the identity provider when it verifies the user
- a transfer URL - redirects the user to the identity provider’s site when they attempt to access Replicon/Polaris
Replicon/Polaris supports use with SAML 2.0 only.
For details on enabling SAML in Replicon/Polaris, contact Deltek Support, or refer to Setting up SAML 2.0 for Replicon or Polaris or Polaris.
FAQs
What secure hashtag algorithm (SHA) signatures does Replicon/Polaris support for use with SAML?
Replicon/Polaris supports SHA-256.
Related topics
Setting up SAML 2.0 for Replicon or Polaris or Polaris
Using single sign-on with Replicon or Polaris
Setting up single sign-on
Manually configuring your SAML 2.0 identity provider