Adding a custom logo to reports
You can add a custom logo to reports in Replicon. This is useful if, for example, you want to include your company’s logo on reports that are being sent to clients, without having to alter the report after the fact.
The logo will appear on the top, left-hand corner of the report, in the UI, and in print or PDF versions.
![]()
This feature is supported in the following products:
- Professional Services Automation
- Professional Portfolio Management
- ProjectTime Plus
- Workforce Management
- TimeOff Enterprise
- Replicon for ADP Workforce Now
- TimeBill Plus
Please note:
- Adding a logo is a simple procedure, but it involves working with Replicon’s API. Contact Replicon Support if you need help carrying out this procedure.
- Once you add it, the logo will be applied to all of your reports
- The maximum allowed file size is 1 MB
Adding a logo
A. Open the UpdateCustomLogo service
- Log in to your Replicon instance, or sandbox instance.
- In the browser address bar, remove everything after .com and replace it with /services/ReportService1.svc/help/test/UpdateCustomLogo.
For example, if your URL is:
https://sb1.replicon.com/yourcompany/projects
Change it to:
https://sb1.replicon.com/services/ReportService1.svc/help/test/UpdateCustomLogo
The UpdateCustomLogo service displays.
- Click + image.
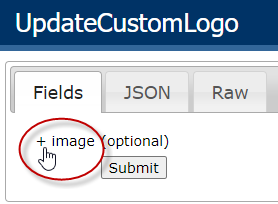
The field will expand to show the parameters it supports.
B. Convert your image to base64
- Open a new browser or tab, and paste the following URL into the address bar:
http://www.base64-image.de
You will be taken to the Base64 Image website, where you’ll convert your image into the base64 format for use in Replicon.
- On the Base64 site, select Click Here, and navigate to your logo file, or drag the file to the Drag & Drop.
Your file will be converted to a base64 format.
- Under Encoding, find your converted image, and click copy image.

- Paste the code to a temporary location (e.g. a Notepad or Word file).
- Delete the following from the beginning of the block of code, leaving the rest of the code intact:
data:image/png;base64,
C. Run the UpdateCustomLogo service
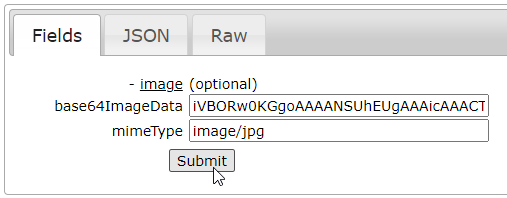
- Return to your original browser tab.
- Copy and paste the edited block of code into the base64ImageData field.
- In the mmieType field, type image/jpg.
- Click Submit.
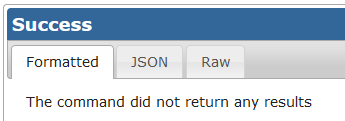
You should see a Success message on the UpdateCustomLogo page.
And, your logo should now display at the top, left-hand corner of any report you generate, or save or email as PDF or print.