Setting up approval paths
Approval paths define the user or users who are responsible for approving items and the approval sequence. They are assigned to users in user profiles.
You can create as many custom approval paths as your organization requires, or use or edit the default approval paths.
If an approver is only required to approve a certain type of time off, you can set up a time off type-specific approval path.
Refer to Setting up approvals and How approvals work for more information.
Adding an approval path
To add a new approval path:
- Go to the administration page for the type of path you want to add, either:
- Administration > Timesheets > Timesheet Approval Paths,
- Administration > Expenses > Expense Approval Paths, or
- Administration > Time Off > Time Off Approval Paths
- Click Add Approval Path, and give the path a name.
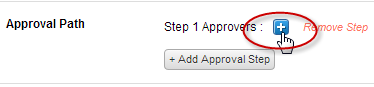
- Click the + icon.
-
Select the type of approver or approval rule. Refer to Assigning an approver or approval rule to a path below for information about the options available.
-
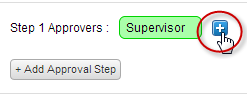
If necessary, add additional approvers to the same step by clicking the + icon again. If you define two approvers at the same step, both will receive each item to approve simultaneously.
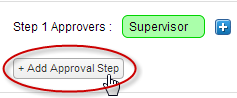
- If required, add another step by clicking the Add Approval Step button.
- Click Add.
You can now assign the approval path to users in their user profiles.
Assigning an approver or approval rule to a path
You have a couple of options when choosing who to assign to an approval path to carry out approvals.
There are three possible options, as outlined in the table below.
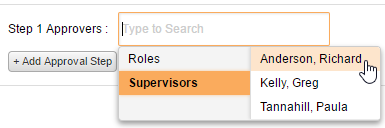
Named supervisor approval |
With this option, you select a specific supervisor by name to approve items. Selecting a named approverTo name a specific approval, select Supervisors when setting up an approval path and choose the name of the specific supervisor.
|
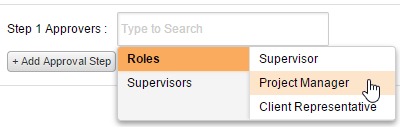
Role-based approval |
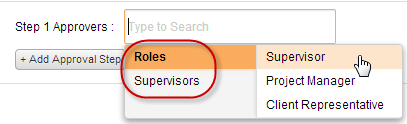
With this option, you don't name a specific individual to approve items; Instead, the individual who holds the selected role for the item's owner approves their items. You may be able to assign the supervisor, project manager, or client representative to act as the approver, depending on the product you're using and the type of approval path. If you're assigning a project manager or client representative, only timesheet or expense data related to projects the approver is associated with will be sent to that approver. Why would you use this option rather than a named supervisor?If you're assigning a supervisor approver, the advantage of this type of approval is that it allows a single path to be assigned to employees with different supervisors, and can make system maintenance easier when supervisors change. Selecting a role-based approverTo set up role-based approval, select Roles when setting up an approval path, and then select a role.
|
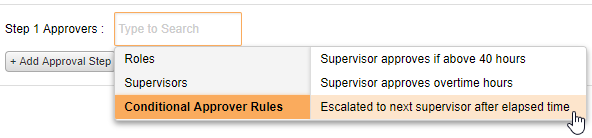
Timesheet approval based on conditional rules |
With this option, whether and when a supervisor needs to approve a timesheet is based on specific conditions defined in a rule. There are currently three default rules available:
Refer to Setting up conditional approval rules for more information. Selecting a conditional approval ruleTo use a conditional rule that determines if approval is required, select Conditional Approval Rules when setting up an approval path and select the name of a rule.
What products include this feature?This option is only available to enterprise-level customers using the new product suite, and currently only applies to timesheet approval paths. |
Setting up time off type-specific approvals
If an approver is only required to approve a certain type of time off, you can set up a time off approval path that will only send them bookings of that type to approve.
For example:
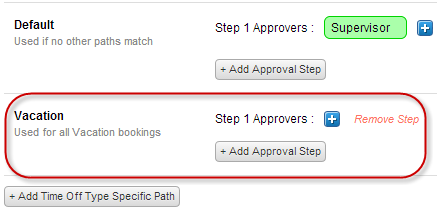
- Your scheduling manager needs to approve all vacation time off, but all other types of time off require supervisor approval only
- In this case, you can create a single time off approval path with Supervisor approval as the default, but define a time off type-specific path for vacation bookings with the scheduling manager as the named approver
- Using this setup, all non-vacation bookings would be approved by the supervisor, while vacation bookings would be approved by the appointed scheduling manager only
To add a time off type specific path:
- Add a time off approval path. Include steps for any default approvers who will approve bookings of all types, if required.
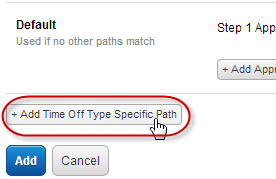
- Click the Add Time Off Type Specific Path button.
- From the drop-down that displays, select the time off type the path should apply to.
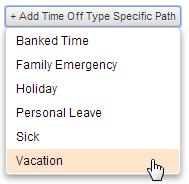
A row for the path will display under the default path.
- Assign approvers to that path.
- Once all approvers for all paths have been defined, click Add.
FAQs
Can we allow certain types of time off bookings to skip approval?
If you assign no approvers to any path defined within a time off approval path, approval for that path will be skipped. So, if you have a time off type that doesn’t require approval, you could set up a time off specific path for a type and assign no approvers to it.
This applies to the default path, as well. So, if only one or two types of bookings need approval and the rest don’t, you can create time off type-specific paths for the types that need approval, and leave the default path blank.
Related links
How approvals work
Setting up approvals (video)
Setting up approvals
Setting up conditional approval rules