Understanding time allocation
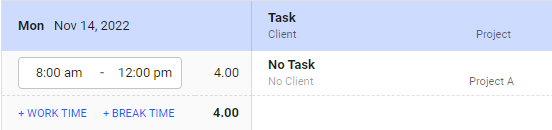
Users typically enter their time directly against projects or activities. For example, a user may enter 8 am to 12 pm on their timesheet and then choose the project or activity for that work segment.
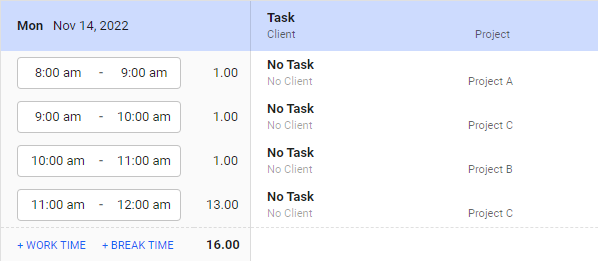
However, if a user regularly switches tasks, it can be cumbersome to create individual time entries or punch in and out each time they start something new. If a user switches tasks every hour, their timesheet may look like this.
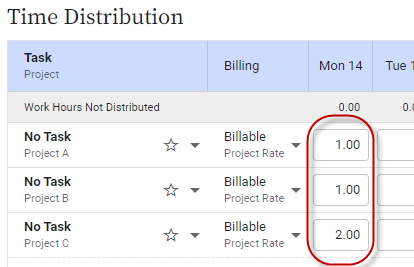
As an alternative, users can capture their working times and then use allocation to distribute the hours across projects or activities. In this case, the user would enter 8 am to 12 pm on their timesheet, for a total 4 hours. Then, in a separate area of the timesheet, they would specify that one of the 4 hours was spent on Project A, 1 hour was spent on Project B, and the remaining 2 hours were spent on Project C.
When should we use allocation?
Allocation is helpful:
- If your users enter in and out times against projects and tasks
If you only need to know the total hours against each project, rather than when the project was worked on, allocation can make it easier for users to record their time.
- If your users punch in and out and you need to track time against projects and tasks (Replicon only)
Currently users cannot select projects when they punch in or out. By using allocation, they can continue to record punches, but they can also specify how much time was spent on each project.
Setting up allocation
To allocate time, set up the timesheet template as follows:
- Add the In/Out Times or Time Punches component, depending on whether users enter in/out times or punch in and out.
If users punch in and out, remember to assign them a punch entry policy.
- Add the Time Distribution Grid component.
- Within the Time Distribution Grid options, enable the fields that you want to allocate the time to, either projects and tasks, activities, or custom fields.
- Choose a time distribution category.
- To ensure all hours are properly accounted for when allocating, add the Allocation matches Allocation Categories validation rule.
- Add the Errors prevent submission workflow condition to prevent the user from submitting the timesheet if the allocations are incorrect.
Once the template is created, assign it to the users that will allocate their time.
Why don’t my timesheet template changes appear in the timesheet?
Changes you make to a timesheet template are only reflected in timesheets that are generated after you make the change. If you need a change to apply to an existing timesheet, you’ll need to delete and regenerate it.
About time distribution categories
Based on the user’s in and out times and the selected distribution category, the system calculates how many hours are available for allocation for each day on the timesheet.
Using the Work Hours category
If you select Work Hours, the total working hours for the day are available for allocation. Time off and break hours are not included.
Using the Payroll category (Replicon only)
If you select Payroll, the total hours for the day are grouped by pay code, as determined by the user’s assigned pay rule. For example, you have 10 hours to allocate - 8 regular time hours and 2 overtime hours.
When you allocate, you not only allocate the hours to projects or activities, but you also choose a pay code for each allocation. With this, you can specify that:
- 5 regular time hours were spent on Project A
- 3 regular time hours were spent on Project B
- 2 overtime hours were spent on Project B
If your users book time off in Replicon, we recommend making project and activity selection optional on the timesheet. This will allow users to create a blank row to allocate their time off hours to.
Validating by category
To ensure all the hours are accounted for when allocating, assign the Allocation matches Allocation Categories validation in the timesheet template. If the allocation totals do not match the total hours available for each category, an error will be shown on the timesheet. This applies for each day individually; each day’s total allocation must match the total hours.
An example for the Work Hours category:
- The user has entered 8 hours of working time.
- The user allocates 3 hours to Project A and 4 hours to Project B.
- Because only 7 of the 8 hours have been allocated, an error is shown when the user attempts to submit the timesheet.
- Once the user allocates the remaining hour, the timesheet can be submitted.
An example for the Payroll category:
- The user has entered 10 hours of time. Based on the user’s pay rule, 8 hours are designated as regular time and 2 hours are overtime.
- The user allocates their time as follows:
|
Project |
Pay Code |
Allocated Hours |
|---|---|---|
|
Project A |
Regular Time |
5 hours |
|
Project B |
Regular Time |
5 hours |
- When the user tries to submit their timesheet, they’ll receive an error because the total allocation for each pay code does not match the total hours available for each pay code.
|
Pay Code |
Total Available Hours |
Total Allocation |
|---|---|---|
|
Regular Time |
8 hours |
10 hours |
|
Overtime |
2 hours |
0 hours |
- They’ll need to correct their allocation to the following to avoid the error:
|
Project |
Pay Code |
Allocated Hours |
|---|---|---|
|
Project A |
Regular Time |
5 hours |
|
Project B |
Regular Time |
5 hours |
|
Project B |
Overtime |
2 hours |
In order for the validation to be applied, you must select a Time Distribution Category in the template. To prevent the user from submitting if a validation error occurs, add the Errors prevent submission workflow condition.
FAQs
When allocated amounts are validated against in and out times and punches, are values rounded?
Durations derived using different entry methods have different levels of granularity. Punches are recorded to the nearest second, while decimal times are recorded to the nearest 36 seconds, and hh:mm entered times are entered as a whole number -- 60 second granularity).
Therefore, when recorded durations are validated against allocated durations, values that fall within 40 seconds of each other are considered to match.
Related topics
Setting up timesheet templates
Setting up time entry formats in timesheet templates
How timesheets work