Creating a new invoice
When you are ready to bill a client, you can create an invoice to send to them.
When you've finished creating the invoice, you can generate a preview of it, send it to the client, and update the status of the invoice according to your company policies. Or, you can keep the invoice open and add more items later.
Creating the invoice
To create an invoice:
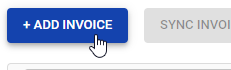
- Go to the Billing > Invoice tab.
- Click Add Invoice.
- Complete the fields on the invoice that displays. Note that:
-
- The Client field is required
- You can edit the Invoice # manually, if desired. Otherwise, the system will assign a number when the invoice is issued
- Altering the Date Of Issue or the Payment Terms automatically adjusts the Payment Due Date
- Add billing line items to the invoice. These can include billable items and ad hoc items.
Your changes will be saved automatically.
Ensuring taxes on the amount billed will be calculated
If taxes apply to the invoice, ensure you've set up a tax profile for the client. Any applicable taxes will then be automatically applied when you select the client name on the invoice.
Refer to Adding a tax profile for invoicing for more information.
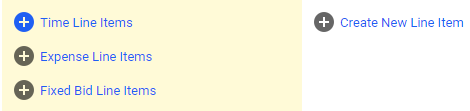
Adding billable items
You can add billable items such as timesheet entries, expenses, or fixed bid items.
Only approved timesheet line items are available to add to an invoice for Time and Materials projects.
To do this:
- Click Time Line Items, Expense Line Items, or Fixed Bid Line Items depending on the type of item you wish to add.
The select line items dialog displays.
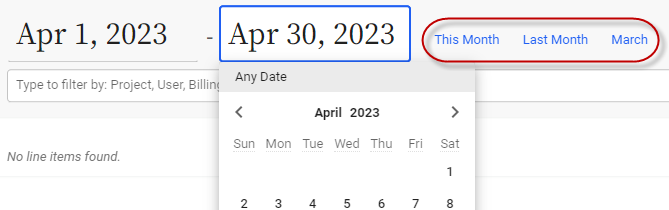
- Select the invoice period using the date selector. Or, use the quick links to jump to a specific period.
- Alter how line items will display on the invoice, if desired. To do this, click the
 icon next to the Summarize By filter in the top, left-hand corner of the page.
![]()
For example, you may wish to sort time line items by timesheet period.
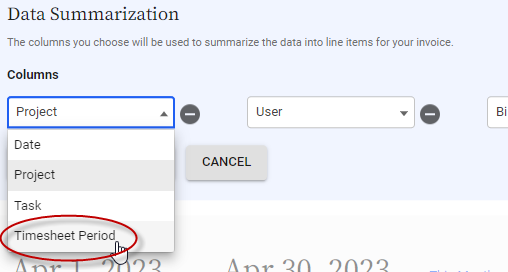
Click the Generate Line Items button to apply any new summary options you've selected.
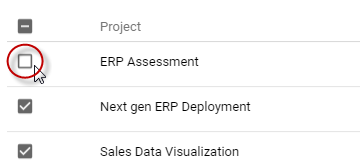
- Remove any items you don't want on your invoice by deselecting the check boxes next to them.
- Click the the Add Selected Line Items button.
The line items display on the invoice.

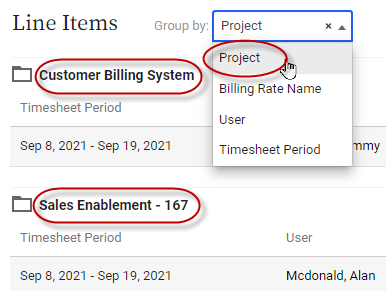
Grouping items
You can use the Group by filter above the line items to organize line items by timesheet period, project, task, user, or billing rate name, when they appear on the invoice.
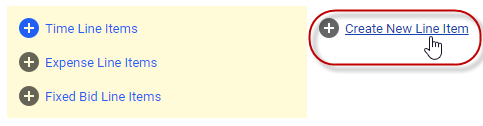
Adding ad hoc items
You can create ad hoc items for costs you want to invoice that aren't accounted for by timesheets or other project expenses. It can also be used to provide a discount to the customer.
- Click Create New Line Item. A blank line item is added to the invoice.
- Optionally, associate a project with the item by clicking the
 icon to the left of the item, selecting a project, then clicking Save.

- Enter a description, units, and rate for the item.

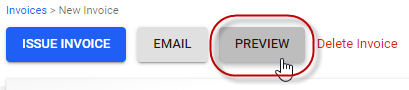
Generating a preview of your invoice
When you are finished adding items to your invoice, you can generate a preview of what it will look like when it's sent to the client. The preview shows what the invoice will look like when formatted using your invoicing template.
FAQs
Why can't I see my fixed bid project when I generate invoicing line items?
Fixed bid projects that are billable at the end of the project will become available for invoicing once they've been assigned Completed status. Fixed bid projects that are billable weekly or monthly will become available for billing at the end of each week or month of the project.
Can I edit timesheets after they've been invoiced?
Yes, providing the Prevent Changes to Invoiced Timesheets workflow condition isn’t enabled in the timesheet’s template. Refer to Correcting billing errors for more information.
How do I add a tax profile to an invoice?
Can I attach a file to an invoice?
No, files can't be attached to invoices in Replicon, though you can add text notes that include links.
Can we connect our banking system to make or receive invoice payments?
No, there's no way to connect to a banking system through Replicon.
Related links
Making changes to a draft invoice
Sending an invoice to your client
Voiding or deleting an invoice
Setting the status of an invoice
How billing works